An easy way to repeat UV in Material Editor of Unreal Engine 4
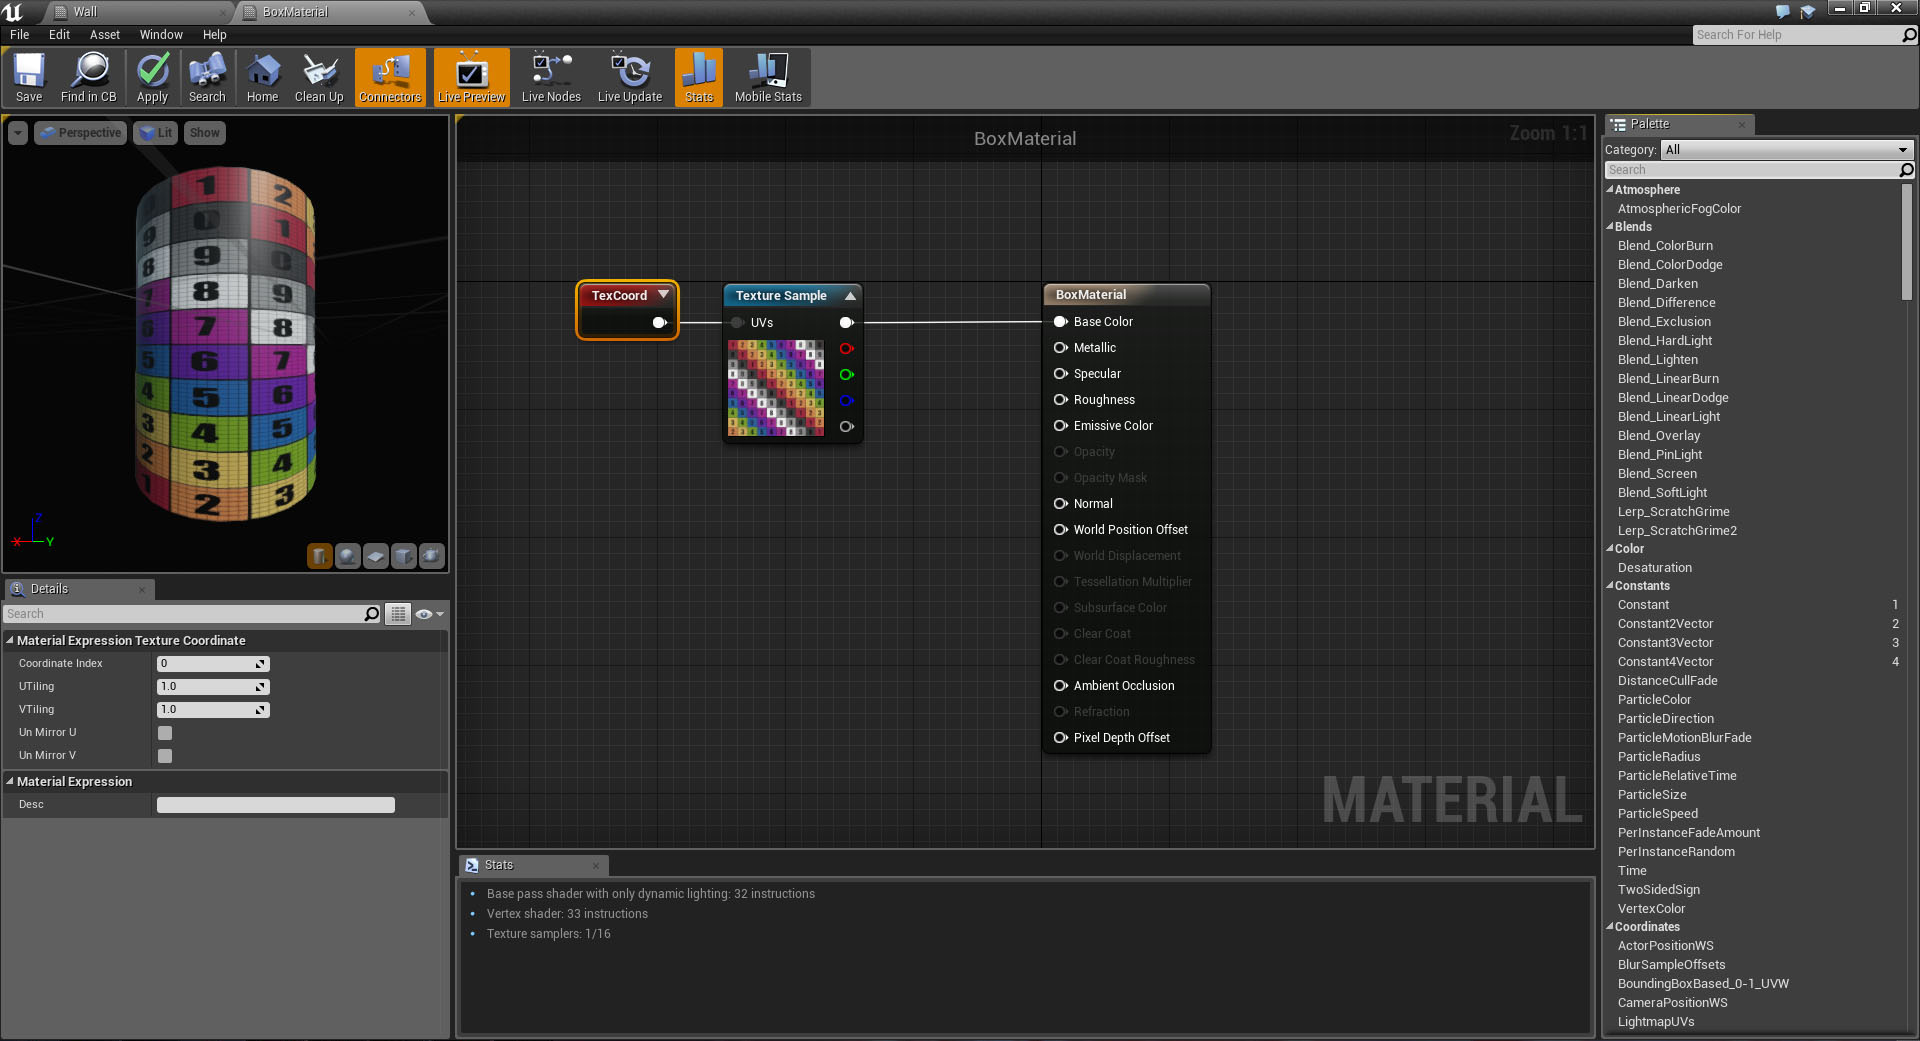
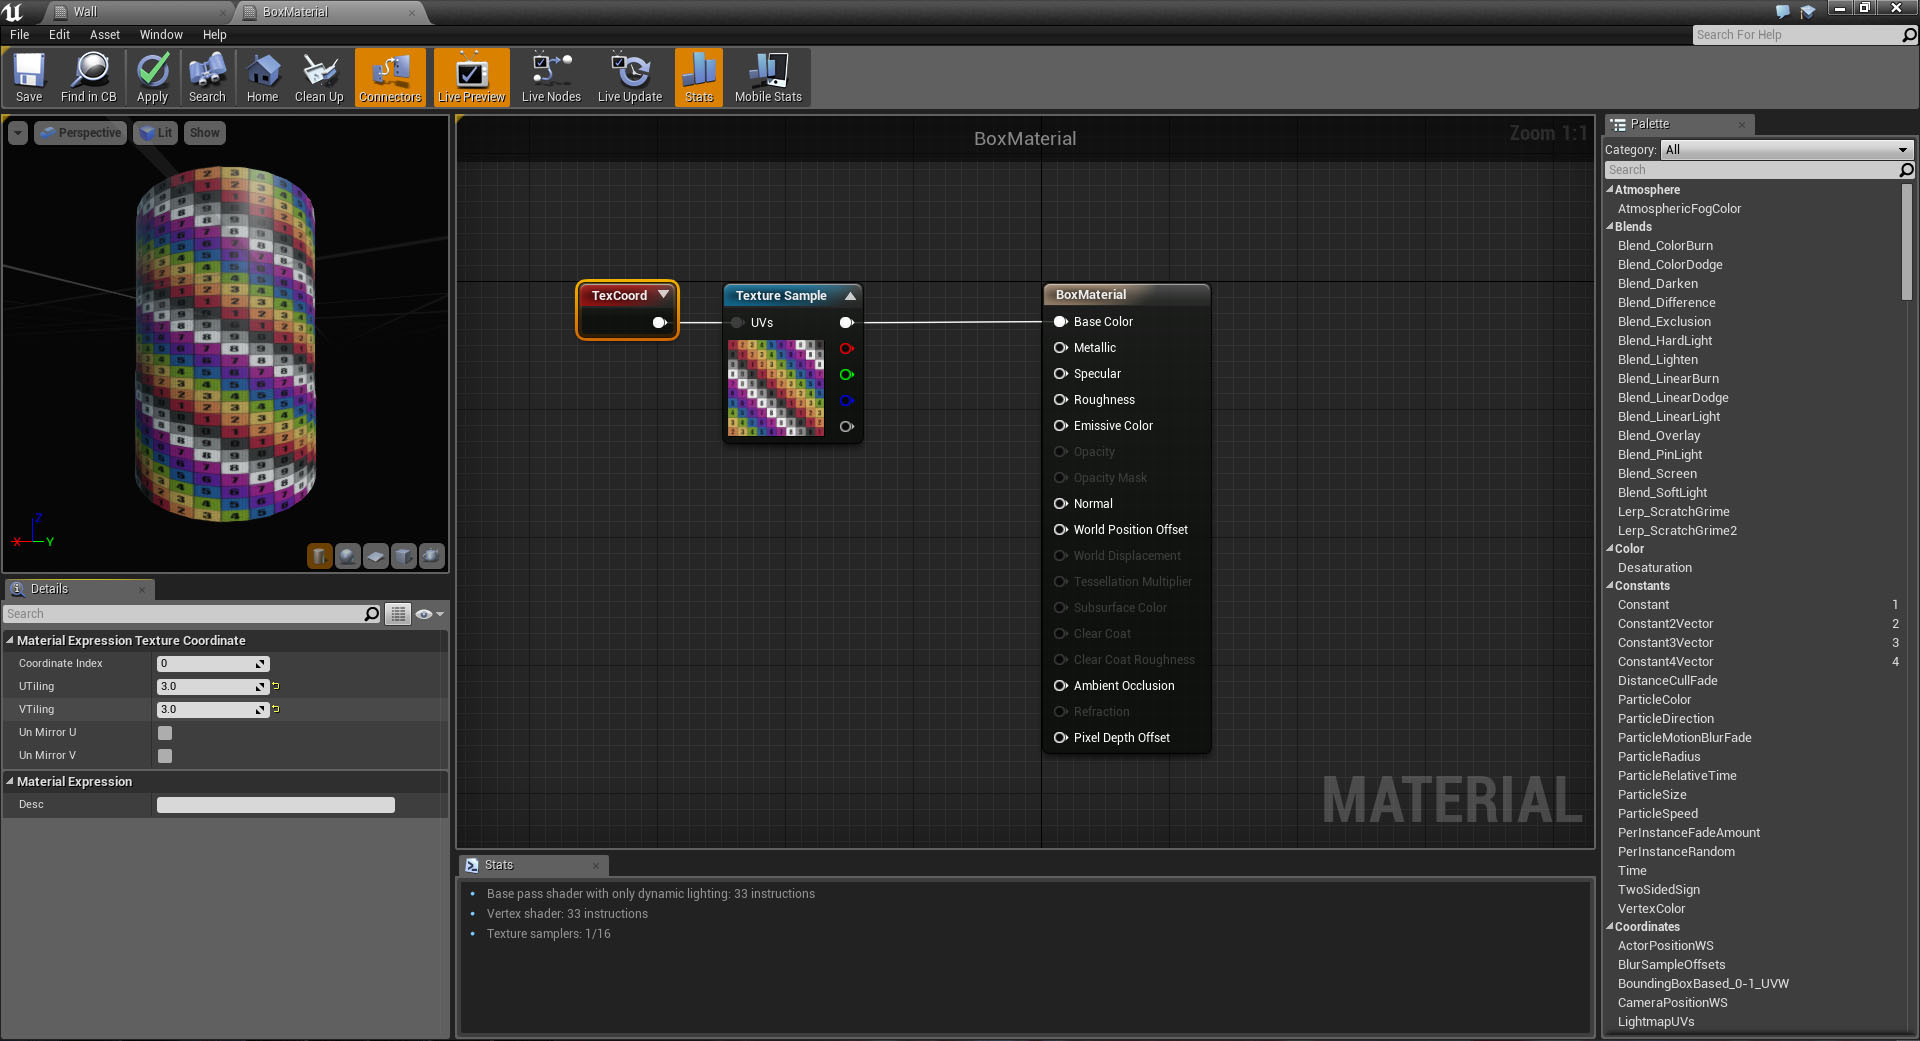
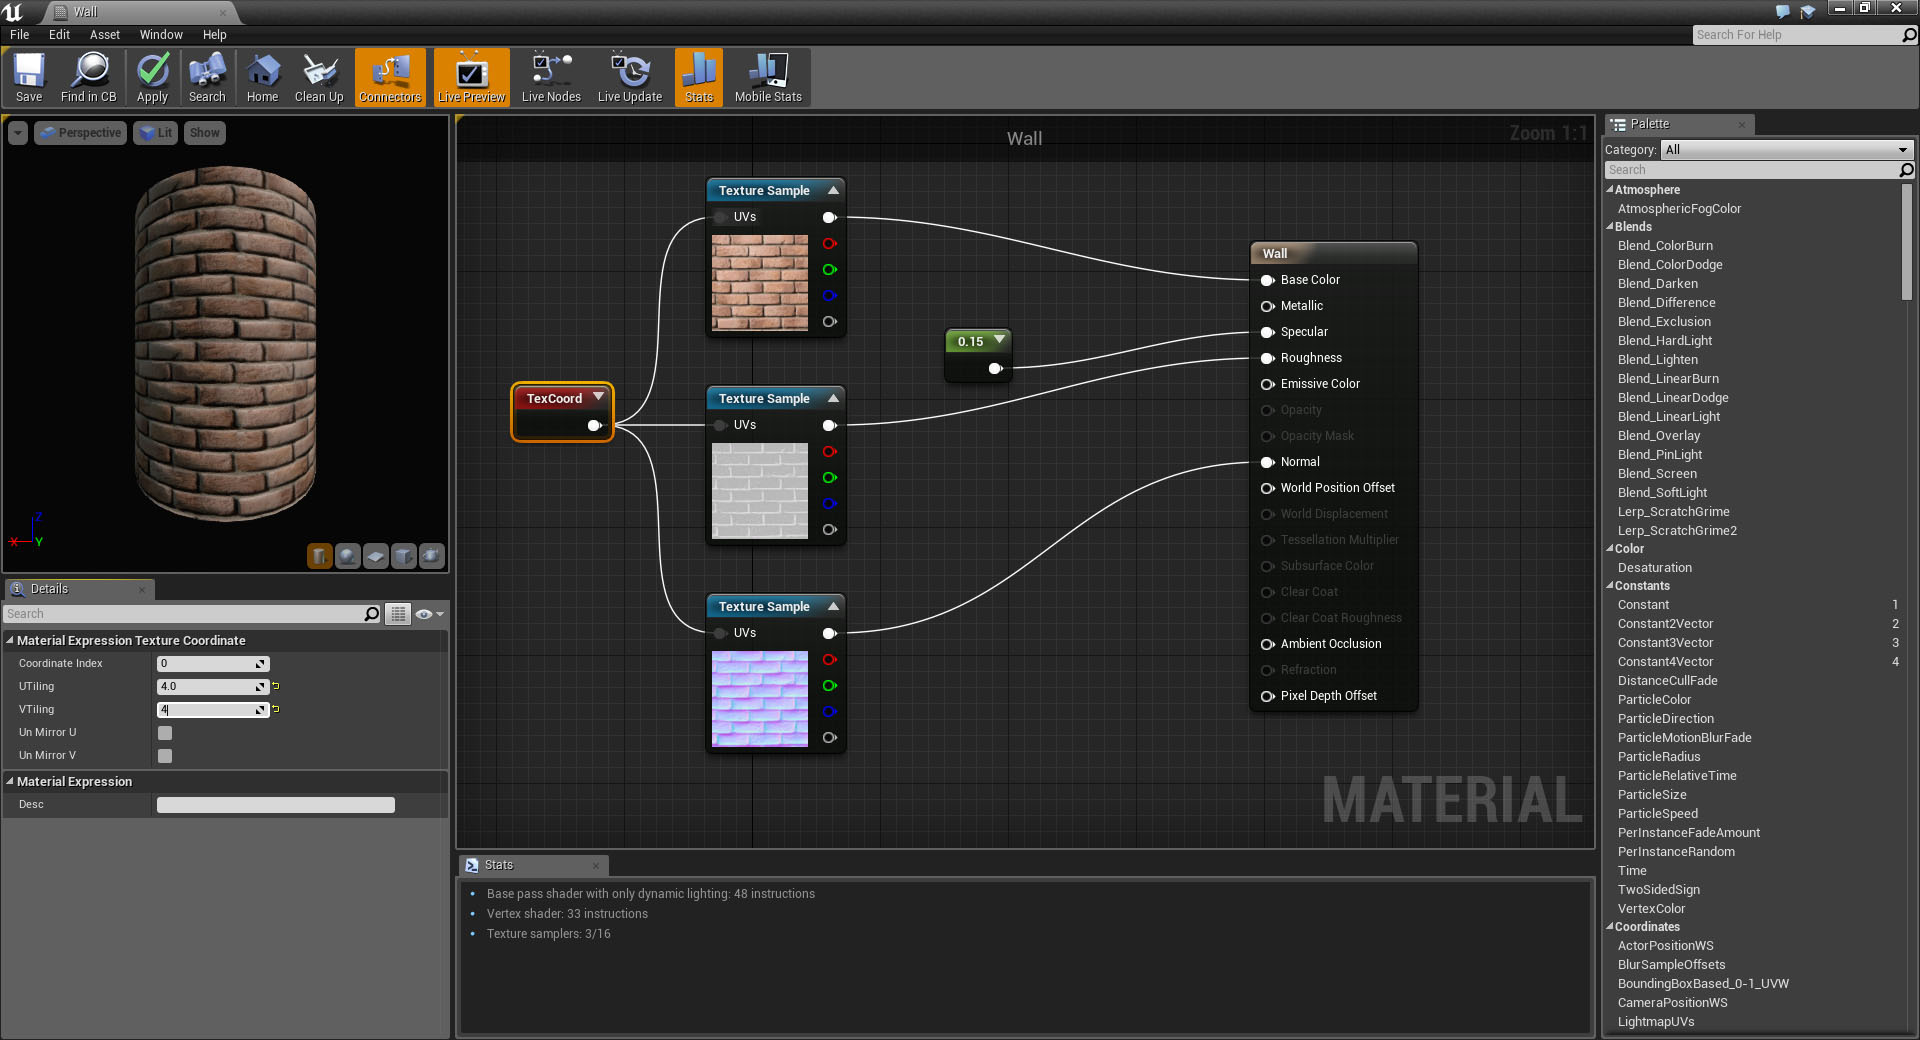


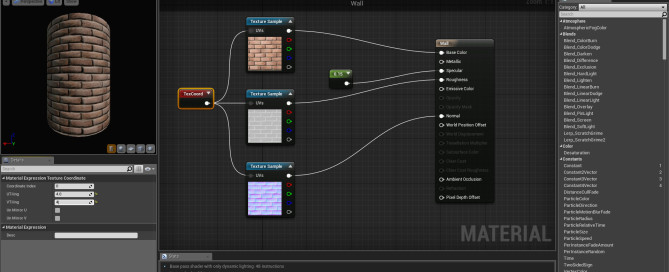
An easy way to repeat UV in Material Editor of Unreal Engine 4
A basic lesson about using HDR Maps inside Unreal Engine 4
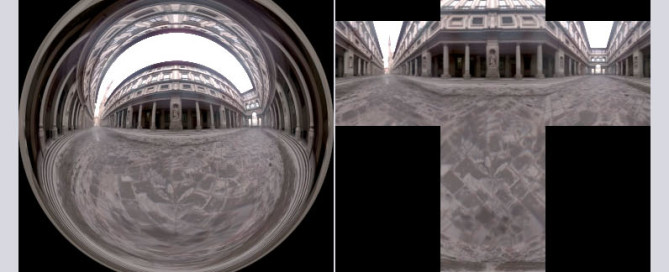
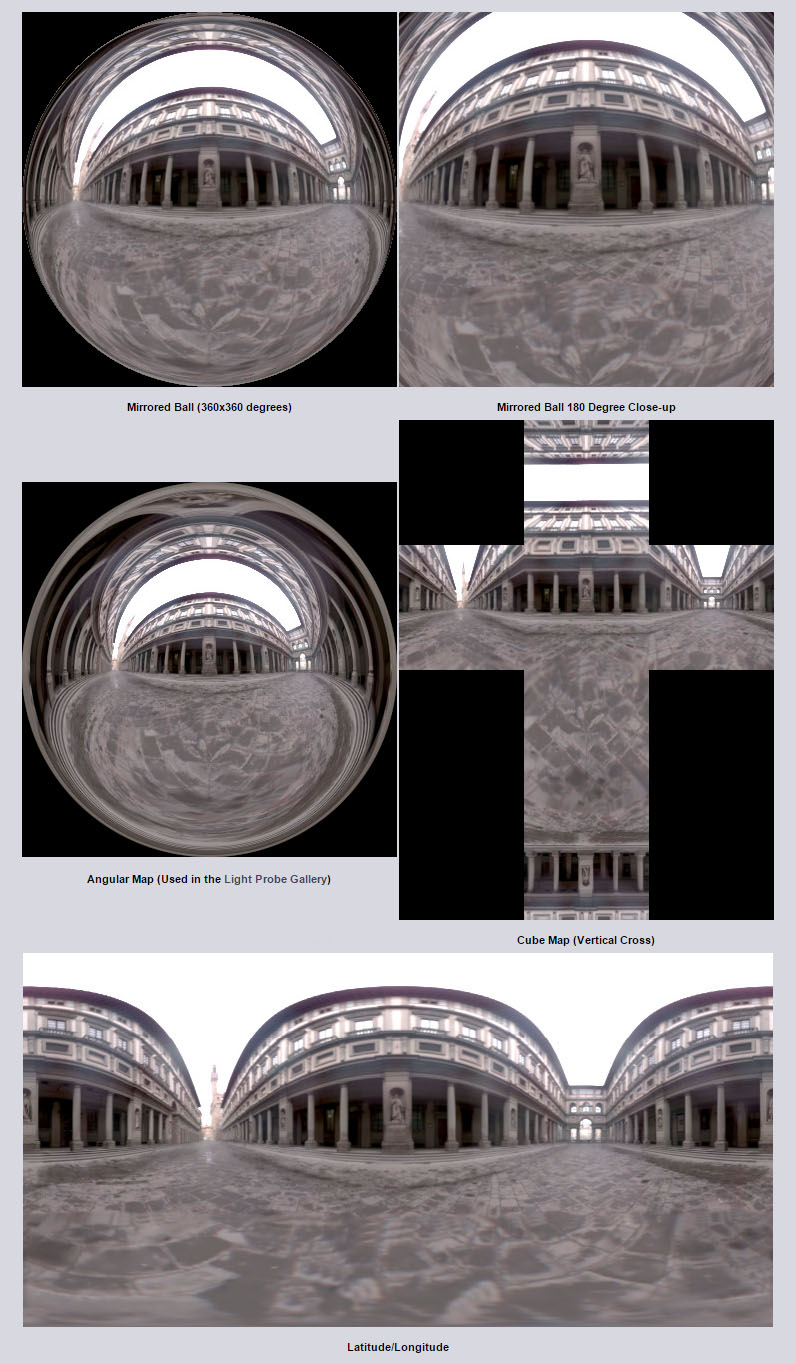
There are a lot of HDR image formats, see the images below:
OPTION 1.
a. Using HDR Shop (http://gl.ict.usc.edu/HDRShop/index.php) to create an HDR Cube Map in cross format
OPTION 2.
a. Using Picturenaut (http://www.hdrlabs.com/picturenaut/index.html) to create an HDR image
b. Using Cube Map Gen (http://developer.amd.com/tools-and-sdks/archive/legacy-cpu-gpu-tools/cubemapgen/) to create a Cube Map in cross format
1. LEFT COLUMN> Lights> Sky Light
2. You can manually specify a HDR skybox cubemaps.
a. Select the Sky Light
b. RIGHT COLUMN> Light> Source Type> SLS Specified Cubemap
c. Content Browser> Import> a HDR Cube Map, DRAG AND DROP over Key Light> RIGHT COLUMN> Cubemap empty image slot
NOTICE:
1. The ambient light will be emitted by HDR Cube Map
2. Metals materials will reflect HDR Cube automatically
Ufficial docs at: https://docs.unrealengine.com/latest/INT/Engine/Rendering/LightingAndShadows/LightTypes/SkyLight/index.html
A basic lesson about lighting inside Unreal Engine
A baked light is precalculated, it can’t be animated in real time but is is faster than movable light.
1. Unreal Engine> File> New Level> Empty Level
2. LEFT COLUMN> Basic> DRAG AND DROP a Cube, create a ground, put on it a Sphere
3. Play, you will see a black screen because there is no light in the scene
4. LEFT COLUMN> Lights> Directional Light
5. Play> You will see the message: ‘Lights need to be rebuilt’ and the text Preview over the shadow of the Sphere.
6. TOP BAR> Build> DROP DOWN MENU> Lighting Quality ‘High’
7. TOP BAR> Build> DROP DOWN MENU> Build Lighting Only, now light is baked.
8. See RIGHT COLUMN> Details> Transform> Mobility> Static / Stationary need baking
9. RIGHT COLUMN> Details> Transform> Mobility >Movable
1. Select the Light, press CANC from keyboard, the light in the scene does not change, it is because the is the old backing
2. LEFT COLUMN> Lights> Point Light> Add a Point Light, the scene does not change.
3. TOP BAR> Build> Build Lighting Only
RIGHT COLUMN> Transform
– Location: XYZ it does not affect Directional Light, Sky Light
– Rotation: XYZ it does not effect Point Light, Sky Light
– Scale: XYZ it does not affect lights
RIGHT COLUMN> Light
– Intensity: energy that the light emits
a. Directional Light, Intesity is just a brightness multiplie
b. Sky Light, Intesity is just a brightness multiplie
c. Point light, 1= 1 lumen, 1700 lumens= 100W light bult
d. Spot Light, 1= 1 lumen, 1700 lumens= 100W light bult
– Light Color
– Attenuation Radius: it limits the emitter radius, small radius cost less.
– Source Lenght: 0= circular reflection highlight, 300= tube reflection highlight
– Temperature:
color of light in Kelvin Grades 1800= red 3200= halogen 5000= white sun 16000= blue
1. Turn light color to White
2. CHECK ‘Use Temperature’
– Affects World: enable/disable light
– Cast Shadows: enable/disable cast shadows, self shadows will remain active
– Indirect Light Intensity: 0= disable Global Illumination for this Light, 1 default, 6 max
– Light profiles: IES Light Profiles are a curve that defines light intensity in an arc that Unreal Engine 4 will “sweep” around an axis to make Point Lights and Spot Lights appear to be casting light more realistically.
1. You can download nice IES here http://www.lithonia.com/photometrics.aspx
2. Content Browser> Import> myfile.ies
3. DRAG AND DROP myfile.ies over RIGHT COLUMN> Details> Light Profiles
– Light Function: it is a Material used to turn the light into a projector.
Please see the ufficial docs at: https://docs.unrealengine.com/latest/INT/Engine/Rendering/LightingAndShadows/LightFunctions/index.html
– Rendering: enable/disable light
The Sky Light can work unsing two ways:
1. The Sky Light captures the distant parts of your level (everything further than SkyDistanceThreshold) and applies that to the scene as a light. That means the sky’s appearance and its lighting / reflections will match, even if your sky is coming from atmosphere, or layered clouds on top of a skybox, or distant mountains.
2. You can also manually specify a HDR skybox cubemaps.
a. Select the Sky Light
b. RIGHT COLUMN> Light> Source Type> SLS Specified Cubemap
c. Content Browser> Import> a HDR Cube Map, DRAG AND DROP over Key Light> RIGHT COLUMN> Cubemap empty image slot
NOTICE:
1. The ambient light will be emitted by HDR Cube Map
2. Metals materials will reflect HDR Cube automatically
Ufficial docs at: https://docs.unrealengine.com/latest/INT/Engine/Rendering/LightingAndShadows/LightTypes/SkyLight/index.html
How to manage a scene in Unreal Engine.
All assets you will use inside your game are pre-loaded and saved by Unreal Engine insise its ‘Content’ folder.
You must divide the contents neatly in order to manage then in the best way.
The standard way is:
Content Browser> Content
– SFX
– BGMusic
– Blueprints
– Maps (here Levels)
– Materials
– Textures
– Particles
– Meshes
A game is divedes in multiple game levels. For example in a platform game there are multiple worlds, every world can be put inside a level.
1. MAIN TOP MENU> File> New Level> default or Empty
2. DRAG AND DROP in Maps folder (it’s not mandatory)
3. RMB over the Map: Edit/Rename/Duplicate etc…
4. MAIN TOP MENU> Window> Levels
1. Content Browser> DRAG AND DROP elements (Actors) into 3D Viewport
2. The elements are added inside RIGHT COLUMN> World Outlines.
Hot Keys of World Outlines are:
– SINGLE LMB empty area: select the actor
– SINGLE LMB over the name: rename the actor
– SHIFT + LMB: select multiple actors
– CTRL + LMB: add/remove selection
– DOUBLE LMB: focus on actor
– RMB: properties rollout> Select> All, Invert etc…
World outliner> Searching:
– Actors matching specific terms can be excluded by using “-” before a term.
– A term can be forced to match exactly, as opposed to a partial match, by adding a “+” before a term.
– Double quotes can be placed around the search term to force an exact match of the full term in the Actor’s long name.
1. RIGHT COLUMN> World Outliner> ON THE TOP RIGHT ‘Create New Folder’
2. DRAG AND DROP elements inside the folder you have just created.
An example can be:
– Lights
– Heros
– Enemys
– Environment
NOTICE: the main parent is the Map
MAIN TOP MENU> Window> Statistics
1. RIGHT COLUMN> World Outliner> DRAG AND DROP son over the parent
With layers you can manage visibility of Actors during the creative process.
For example, you might be working on a building that has multiple levels but is comprised of many modular parts. By assigning each floor to a layer, you can hide each of the floors you are not working on making the top view much more manageable.
1. MAIN TOP MENU> Window> Layers, Layer Tab will be added on the RIGHT COLUMN
2. RMB into Layer empty panel> Create Empty Layer
3. Select Actors in the 3D Viewport> RIGHT COLUMN> Layer Tab> RMB over the new Layer> Add Selected Actors to Selected Layers
OR
3. World Outliner> DRAG AND DROP Actor over Layers Tab> yourLayer
NOTICE: an Actor can be in as many layers as you want.
4. Select the Layer> BOTTOM LEFT ‘See Contents’ and TOP LEFT small icon ‘Back’
OR
4. DOUBLE LMB over the Layer name, INTO ‘World Outliner’ the Actors inside the Layer will be selected
0. 3DSMax
– Use the setup scene in meters, you can find the right setup for human modeling here: Unit Setup
– Create a Box 1x1x1 name it ‘BoxMesh1x1x1’
– From Material Editor assign ‘BoxMaterial’ into Diffuse Map an ‘uvrefmap.jpg’
– Create a Smooting Group
– Select the Mesh> MAIN Button> Export> Export Selected> BoxExported.FBX
Setup FBX Exporter:
Geometry>
– Smoothing Groups check
– Tangents and Binormals check
– Triangulate check
– Others uncheck
FBX File Format>
– Type: Binary
– Version: FBX 2014
Ref: https://docs.unrealengine.com/latest/INT/Engine/Content/QuickStart/1/4/index.html
1. Launch Unreal Engine
2. Tab New Project>
– Blank
– Desktop / Console
– Maximum Quality
– With Starter Content
– select a Folder for your project for example ‘Unreal’ folder
– choose a project Name for example ‘Test’
Click ‘Create Project’ button
The software will create:
Unreal/Test/Config/ some .ini files
Unreal/Test/Content/StarterContent
Unreal/Test/Intermediate
Unreal/Test/Saved
Unreal/Test.uproject
3. UE4> bottom ‘Content Browser’> select ‘Content’ folder> Add New> New Folder ‘Box’
Now there are:
Content>
– Box
– StarterContent
4. Double Click on ‘Box’
5. Content Browser> Import> select BoxExported.FBX>
– Import as Skeletal uncheck
– Auto Generate Collision uncheck (auto create a collision box)
– Import Materials check (auto import 3DS Max Material)
– Import Textures check (auto import Texture of 3DSMax Material)
>’Import’ button
Now inside Content/Box trere are
– BoxExported (mesh)
– BoxMaterial (3DS Max Material)
– uvrefmap.jpg
NOTICE: the .fbx memorize mesh, smooting groups, max material, texture position into your hard drive
6. There are some asterisks over imported elements because they was not saved inside ‘Content’ folder of the
project. Let’s save it:
UE4> bottom ‘Content Browser’> Save All
Asterisks disappears, watch the folder Test/Content/Box now there are:
– BoxExported.uasset
– BoxMaterial.uasset
– uvrefmap.uasset
All elements was converted in Unreal Assets format.
1. Content Browser> Import> select uvrefmap2.png
2. Content Browser> Save All
1. Content Browser> DRAG AND DROP ‘BoxExported’ (the mesh) over Perspective view
2. Perspective window> Top Right> Move Rotate Scale / remove Snaps to manipolate the mesh
3. Camera movements:
– LMB + WASD walk
– RMB look around
– Mouse Wheel to Zoom in/out
1. RIGHT COLUMN> World Outliner> DRAG AND DROP son over the parent

