videogames development

Google Cardboard and Gear VR Basic Scene Setup

I think it is the right moment to talk abour VR in games and in multimedia entertainment.

WHAT IS VIRTUAL REALITY?

The word ‘virtual reality’ has been used and abused for many years in the comics and in science fiction films.

In the 70s science fiction movies VR was imagined as a computer-simulated reality that replicates an environment, real or imagined, and simulates a user’s physical presence and environment to allow for user interaction.

In the ‘real life’ Atari founded a research lab for virtual reality in 1982, but the lab was closed after two years due to Atari Shock (North America video game crash of 1983).

In 1991, Sega announced the Sega VR headset for arcade games and the Mega Drive console. It used LCD screens in the visor, stereo headphones, and inertial sensors that allowed the system to track and react to the movements of the user’s head.

On 2014, Facebook purchased a company that makes virtual reality headsets, Oculus VR, for $2 billion. Sony announces Project Morpheus (its code name for PlayStation VR), a virtual reality headset for the PlayStation 4. Google announces Cardboard, a do-it-yourself stereoscopic viewer for smartphones.

On 2015, HTC partnered with Valve Corporation announced their virtual reality headset HTC Vive and controllers, along with their tracking technology called Lighthouse.

Now the technology to make VR is reality, and it is accessible to all, now it is up to software developers to create killer applications to exploit it properly.

HOW IT WORKS?

Stereoscopy is the keyword. Stereoscopy is a technique for creating or enhancing the illusion of depth in an image by means of stereopsis for binocular vision.
Most 3D displays and gears use this stereoscopic method to convey images. It was first invented by Sir Charles Wheatstone in 1838, then… not science fiction but old story.

SOFTWARE SETUP

1. Download Java SE Development Kit 8 http://www.oracle.com/technetwork/java/javase/downloads/jdk8-downloads-2133151.html
Install it.

2. Download Android Studio https://developers.google.com/vr/unity/get-started-android
Install using the “SDK Tools Only” option.
On some Windows systems, the launcher script does not find where the JDK is installed. If you encounter this problem, you need to set an environment variable indicating the correct location.
Select Start menu > Computer > System Properties > Advanced System Properties. Then open Advanced tab > Environment Variables and add a new system variable JAVA_HOME that points to your JDK folder, for example C:\Program Files\Java\jdk1.8.0_77.

3. Download the Google VR SDK for Unity here: https://developers.google.com/vr/unity/

4. Open Unity (working with the Google VR SDK for Unity requires Unity 5.2.1 or later)
Assets> Import Package> ‘GoogleVRForUnity.unitypackage’, uncheck Plugins/iOS and ‘Import’.
Under Project window we will see Assets/GogleVR and Assets/Plugin

NOTICE: if the Unity console write about a script error, ignore it and Switch Platform to Android

5. Unity> Build Settings> Android and Texture Compression ETC2 (GLES 3.0)

UNITY CAMERA BASIC SETUP

1. Create a New Scene

2. Create a Plane and a Cube

3. Project> Assets> GoogleVR> Prefabs> GvrMain DRAG AND DROP in Hierarchy

4. Hierarchy> GvrMain > Head> Main Camera> Inspector> Add Component> Physics Raycaster (NOT THE Physics 2D Raycaster!!!)
The Raycaster raycasts against 3D objects in the scene. This allows messages to be sent to 3D physics objects that implement event interfaces.

5. Delete the old ‘Main Camera’

6. Project> Assets> GoogleVR> Prefabs> UI> GvrReticle, DRAG AND DROP in Hiearchy over Main Camera, here we are:
GvrMain
– Head
– – Main Camera
– – – Main Camera Left
– – – Main Camera Right
– – – CardboardRetiche

7. Press Play and rotate the camera using ALT + move the mouse without clicking.

UNITY INPUT SETUP

1. RMB on a empty area in Hierarchy> UI> add an ‘Event System’

2. Event System> Inspector> Add Component> GazeInputModule.cs, gear icon> ‘Move Up’ the component, the correct order is:

Transform
EventSystem (Script)
GazeInputModule (Script)
Standalone InputModule (Script)

3. Cube> Inspector> assign a Green material

4. Cube> Inspector> Add Component> EventTrigger (Script)> ‘Add New Event Type’> Pointer Enter> +> in the Empty Slot DRAG Cube, No Function> MeshRenderer> Material> DRAG a Red material

5. Cube> Inspector> Add Component> EventTrigger (Script)> ‘Add New Event Type’> Pointer Exit> +> in the Empty Slot DRAG Cube, No Function> MeshRenderer> Material> DRAG a Green material

6. Play

– pointer Enter material changes to Red
– pointer Exit material changes to Green

The interactions detection system flow is:

a) main Camera/Physics Raycaster + CardboardReticle send rays
b) rays casts Cube/Box Collider
c) Cube/Event Trigger sends data to Hierarchy/EventSystem
d) Hierarchy/EventSystem + Gaze Input Module manages data

If it does not work check the ‘Physics Raycaster (Script)’ attached to the Main Camera or the Box Collider of the Cube.

CARDBOARD / GEARVR BUILDING SETUP

1.
GearVR:
– Player Settings> Virtual Reality support enabled -> this split the camera and track position/rotation for GearVR only
– GvrMain> GvrViewer (Script)> VR Mode disabled
– GvrMain> Head> GvrHead (Script)> Track position disabled
– GvrMain> Head> GvrHead (Script)> Track rotation disabled

Card Board:
– Player Settings> Virtual Reality support disabled
– GvrMain> GvrViewer (Script)> VR Mode enabled -> this split the camera for Card Board only
– GvrMain> Head> GvrHead (Script)> Track position enabled -> this track position for Card Board only
– GvrMain> Head> GvrHead (Script)> Track rotation enabled -> this track rotation for Card Board only

2.
Build Settings> Player settings
– Company Name: MyCompany
– Product Name: CardBoardTest
– Default orientation: Landscape Left
– Multithreaded Rendering: on
– Bundle Identifier: com.mycompany.cardboardtest
– Minimum API Level: Android 4.1 (API Level 16)
– Device Filter: ARMv7
– Android TV Compatibility: off

3. Add the corrent scene to build

4. Build and Play!

5. Assets> Plugins> Android> create a folder ‘assets’, copy here your oculus signature file, generate it using https://developer.oculus.com/osig/

References:
Wikipedia – https://en.wikipedia.org/wiki/Stereoscopy
Dev Android – https://developer.android.com/studio/index.html
NurFACEGAMES – https://www.youtube.com/watch?v=eLCj6_gtLc4

By |CSharp, Unity3D, Video Games Development|Commenti disabilitati su Google Cardboard and Gear VR Basic Scene Setup

Unreal Engine 4 – How to create Materials – Basic Tutorial

Unreal Engine 4 – How to create Materials – Basic Tutorial

Materials are assets applied to meshes, contributing to a scene’s visual aesthetic.

Flat Color Material

1. Run Unreal Engine 4

2. Content Browser> Add New> Material> rename it ‘MyMaterial’, the asterisk means that it is non saved yet.

3. Content Browser> Save All

4. Double Click on ‘MyMaterial’ thumbnail, the Material Editor will be opened
.

NOTICE the Main Material Node for ‘MyMaterial’ in the middle.

The hotkeys are:
– 1,2,3,4: create 1-4 Vector Constant Node
– U: UV Coordinates
– T: Texture Samples Node
– S,V Scalar parameter, Vector Parameter
– A,D,M: Add, Divide, Multiply

– LMB: drag selection box
– RMB: pan
– Mouse Wheel: zoomin/out

5. RIGHT COLUMN> Constants> Constant3Vector (3Vector means RGB, 4Vector means RGBA)

– RMB over Constant3Vector to Delete, Cut, Copy, Duplicate etc…
– DOUBLE LMB to options, set R=255 G=000 B=000

6. Connect Constant3Vector to Base Color

7. TOP TOOLBAR> ‘Apply’ to apply the mod to material inside Content Browser

8. TOP TOOLBAR> ‘Save’ to save the asset, it is the same of Content Browser> Save All

A Rock Material – Diffuse and Normal

Shader Type

1. Click over ‘MyMaterial’ Main Material Node, it will turn to yellow, now it is selected

2. LEFT COLUMN> Material> Shading Model> Subsurface, MyMaterial pins changes

Color

3. RIGHT COLUMN> Texture> Texture Sample, drag and drop it in the working area

4. LMB over Texture Sample, LEFT COLUMN> notice ‘Material Expression Texture Base’

5. Content Browser> DRAG AND DROP a color texture over ‘Material Expression Texture Base’ slot

6. Connect Texture Sample (the diffuse map)> white pin TO MyMaterial> Base Color pin

Normal

7. Repeat from point 3 to 5 for Normal Map

8. Connect Texture Sample (the normal map)> white pin TO MyMaterial> Normal Color pin

Constant Nodes

For italian people; sono semplicemente delle costanti numeriche, ad esempio collego un Constant node con valore 0.5 a Opacity per avere un materiale trasparente al 50%.

1. RIGHT COLUMN> DRAG 3 ‘Constant’ and 1 ‘Constant3Vector’

2. DOUBLE LMB over:
– Constant, LEFT COLUMN set 0
– Constant, LEFT COLUMN set 0.8
– Constant, LEFT COLUMN set 0.95
– Constant3Vector, LEFT COLUMN set RED 255 0 0

3. Make the connections

Constant (0)-> Specular
Constant (0.8)-> Roughness
Constant (0.95)-> Opacity
Constant3Vector (RED) -> Sub Surface Color

Assign a material to a mesh (Actor) in the scene

Content Browser> DRAG AND DROP the Material over the mesh in the 3D Viewport

OR

RIGHT COLUMN> World Outliner> select the mesh> RIGHT COLUMN> Details> Materials> use the dropdown menu to assign material

Ref: https://docs.unrealengine.com/latest/INT/Engine/Content/QuickStart/2/index.html

By |Unreal Engine, Video Games Development|Commenti disabilitati su Unreal Engine 4 – How to create Materials – Basic Tutorial

Unity – Local Data Base – SQLite – JavaScript

Unity – Local Data Base – SQLite – JavaScript

What is SQLite?

SQLite is a database system that requires no administration, it is a single file .db that can be written to a USB memory stick.

It is not directly comparable to client/server SQL database engines such as MySQL, Oracle, PostgreSQL, or SQL Server since SQLite is trying to solve a different problem.

SQLite Works Well:

– cellphones, set-top boxes, televisions, game consoles

– media cataloging and editing suites, CAD packages, record keeping programs

– low to medium traffic websites (a conservative estimate of fewer than 100K hits/day)

Creating and Exporting:

– the resulting database is a single file that can be written to a USB memory stick or emailed to a colleague.
A DB file looks like this: PlayersSQLite.db

– it provides access to that file via standard SQL commands.

– a lot af free reader for developers and end-users
I like SQlite Browser (http://sqlitebrowser.org/)

Controls and wizards are available for users to:

Create and compact database files
Create, define, modify and delete tables
Create, define and delete indexes
Browse, edit, add and delete records
Search records
Import and export records as text
Import and export tables from/to CSV files
Import and export databases from/to SQL dump files
Issue SQL queries and inspect the results
Examine a log of all SQL commands issued by the application

Available for Windows, MacOSX, Linux

Official website at: http://www.sqlite.org/whentouse.html

Another good software to create SQLite DB is SQLite Manager, a it is a plug-in for Firefox, free and crossplatform (https://addons.mozilla.org/ru/firefox/addon/sqlite-manager/)

SQLite Browser

1. Open SQLite Browser> File> New Database> create players.db

2. Table: players

3. Add fields:
– ID – INTEGER the ptimary key – check AI and PK (AUTOINCREMENT PRIMARY KEY)
– Name – TEXT to store var:String (Pietro)
– Scores – INTEGER to store var:int (124)
– Time – REAL to store var:float (20.7)

Move field up or down if necessary

or

CREATE TABLE `players` (
	`ID`	INTEGER PRIMARY KEY AUTOINCREMENT,
	`Name`	TEXT,
	`Score`	INTEGER,
	`Time`	REAL
);

4. click ‘OK’

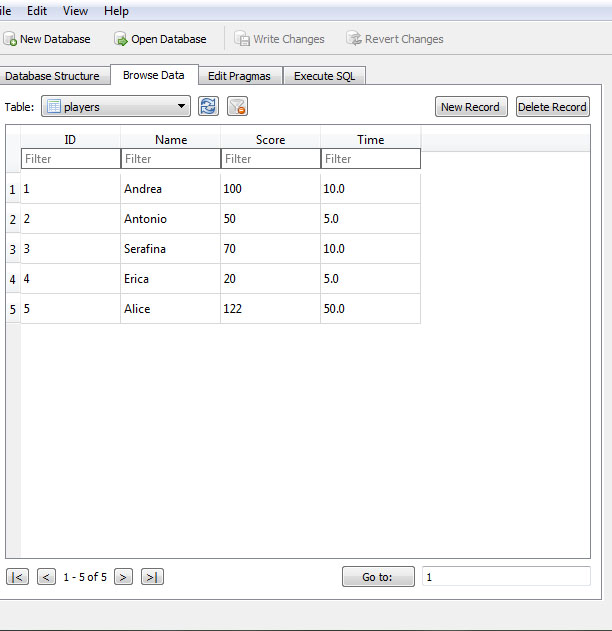
5. Populate the database:
Tab ‘Browse Data’
Table: Players

click ‘New Record’

the id field will auto increment

input Name – Score – Time

Andrea – 100 – 10
Antonio – 50 – 5
Serafina – 70 – 10
Erica – 20 – 5
Alice – 122 – 50

click ‘Write Changes’

SQLite and Unity

Unity 5.x comes with all SQLite Library included, you can see that in your:
C:/Programmi/Unity/Editor/Data/Mono/lib/mono/2.0/
“Mono.Data.dll”, “Mono.Data.Sqlite.dll” and “Mono.Data.SqliteClient.dll”

0. File> Build Settings…> PC MAC LINUX STAND ALONE
NOTICE: if you set WEB Player the console send you the error: Namespace ‘Mono.Data.Sqlite’ not found…
because of SQlite DOES NOT WORK with WEB PLAYER!

1. Download Precompiled Binaries for Windows 32> sqlite-dll-win32-x86-3081101.zip here:
https://www.sqlite.org/download.html
Inside the zip there are: sqlite3.dll and sqlite3.def

2. Download Precompiled Binaries for Windows 64> SQLite3-64.7z here:
http://blog.synopse.info/post/2013/03/23/Latest-version-of-sqlite3.dll-for-Windows-64-bit
There is sqlite3-64.dll, renaming to sqlite3.dll

Download library for Android> sqlite.so here:
https://github.com/ORuban/SQLite4Unity3d/tree/554b7ec0bea8fa17e5c5a11fd37b8f615dc549bc/Plugins/Android/libs/x86

2. Create

– Assets/Plugins/sqlite3.dll -> the sqlite3-64.dll renamed + sqlite3.def (Win MAC IOS)

– Assets/Plugins/Android/sqlite.so (Android)

– Unity/Scenes/MyScene.unity

– Unity/Scripts/dbAccess.js

– Unity Project Root/players.db (the database)

NOTICE: Project> Plugins> sqlite3.dll> Inspector, here you can setup the target platform, do not change anything, the recognization is automatic.

3. GameObject> Create Empty> name it GameController

DB Connection and Delete Table Contents

4. attach to GameController the script dbAccess.js:


#pragma strict

// IMPORT NAMESPACE CLASSES START ----------------------
// Mono non includone SQlite, devo importarlo a parte
// le classi le troviamo qui: C:/Programmi/Unity/Editor/Data/Mono/lib7mono/2.0/
import System.Data;  // we import our  data class
import Mono.Data.Sqlite; // we import sqlite
import System.Collections.Generic;
// IMPORT NAMESPACE CLASSES END ------------------------

// importo il namespace per verificare se un file esiste
import System.IO;

// variables for basic query access
var connection : String;
var dbcon : IDbConnection;
var dbcmd : IDbCommand;
var reader : IDataReader;

function Start () {
	OpenDB ();
}// END Start()

function Update () {
}// END Update()

// ####################################################################
// OPEN DB ############################################################
// ####################################################################
function OpenDB () {
	// Open Connection START ----------------------------
	
	// Windows MAC OS IOS +++++++++++++++++++++++++
	// è la posizione che assegnerà nella build finale
	// SE LO TROVA APRE LA CONNESSIONE
	// SE NON LO TROVA LO CREA IN AUTOMATICO NELLA ROOT DEL PROGETTO UNITY
	connection = "URI=file:players.db"; 
	// Android ++++++++++++++++++++++++++++++++++++
	// connection = "URI=file:" + p; // like this will NOT work on android
    // connection = "URI=file:" + Application.persistentDataPath + "/" + "players.db";  ---> PER ANDROID TOGLIERE QUESTO COMMENTO
    
    // DEBUG: check if connection exists START --------------------
    dbcon = new SqliteConnection(connection);
    if(dbcon != null) {
    	print ("MY COMMENT: connection to players.db OK");
    }
    else{
    	print ("MY COMMENT: connection to players.db FAIL");
    }
  	// DEBUG: check if connection exists END ----------------------
    
    dbcon.Open(); // open connection
    
	// Open Connection END --------------------------------
	
	// DEBUG: check if DB exists START --------------------
 	var fileName = "players.db";
    var path = Directory.GetCurrentDirectory() + "\\" + fileName;
    if (File.Exists(path))
    {
         print ("MY COMMENT: players.db file exists");
    }
    	else
    {
         print ("MY COMMENT: players.db file NOT exists");
    }
	// DEBUG: check if DB exists END ----------------------
}// END OpenDB

// ####################################################################
// DELETE TABLE #######################################################
// ####################################################################
// This function deletes all the data in the given table.  Forever.  WATCH OUT! Use sparingly, if at all
    function DeleteTableContents() {
    var query : String; // la definisco all'interno della funzione perchè resti limitata alla funzione corrente
    query = "DELETE FROM players" ;
    dbcmd = dbcon.CreateCommand();
    dbcmd.CommandText = query; 
    reader = dbcmd.ExecuteReader();
    Debug.Log("You have just deleted players tab");
    }

5. GameObject> UI> Button> name it Button-DeleteTableContents

Button-DeleteTableContents> Inspector> OnClick()> + > DRAG GameController and take function DeleteTableContents()

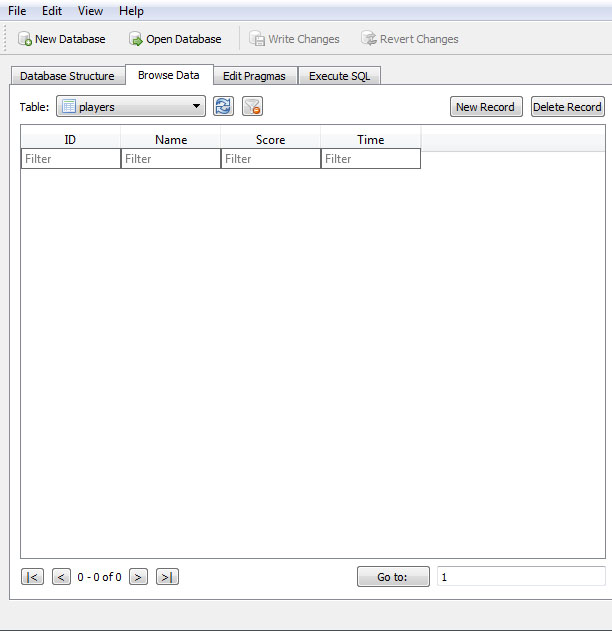
6. Play and press the button, try reload players.db with SQLite Browser, the table players will be empty.
img-001

img-002

We can analize the code:

1. import namespaces to integrate functions for ‘SQLite’ and ‘if file exist’


// IMPORT NAMESPACE CLASSES START ----------------------
// Mono non includone SQlite, devo importarlo a parte
// le classi le troviamo qui: C:/Programmi/Unity/Editor/Data/Mono/lib7mono/2.0/
import System.Data;  // we import our  data class
import Mono.Data.Sqlite; // we import sqlite
import System.Collections.Generic;
// IMPORT NAMESPACE CLASSES END ------------------------

// importo il namespace per verificare se un file esiste
import System.IO;

2. Set variables for basic query access


// variables for basic query access
var connection : String;
var dbcon : IDbConnection;
var dbcmd : IDbCommand;
var reader : IDataReader;

3. Open into Start() the DB connection


connection = "URI=file:players.db"; 
dbcon = new SqliteConnection(connection);
dbcon.Open(); // open connection

4. Delete Tab function using SQL syntax


function DeleteTableContents() {
    var query : String;
    query = "DELETE FROM players" ;
    dbcmd = dbcon.CreateCommand();
    dbcmd.CommandText = query; 
    reader = dbcmd.ExecuteReader();
    Debug.Log("You have just deleted players tab");
    }

Create Table


// ####################################################################
// CREATE TABLE #######################################################
// ####################################################################
// This function create tables
function CreateTable() { 
        // Create a table, name, column array, column type array
        var name : String = "friends";
        var col = ["Name", "Surname"];
        var colType = ["TEXT", "TEXT"];
        var query : String;
        query  = "CREATE TABLE " + name + "(" + col[0] + " " + colType[0];
        for(var i=1; i<col.length; i++) {
            query += ", " + col[i] + " " + colType[i];
        }
        query += ")";
        dbcmd = dbcon.CreateCommand(); // create empty command
        dbcmd.CommandText = query; // fill the command
        reader = dbcmd.ExecuteReader(); // execute command which returns a reader
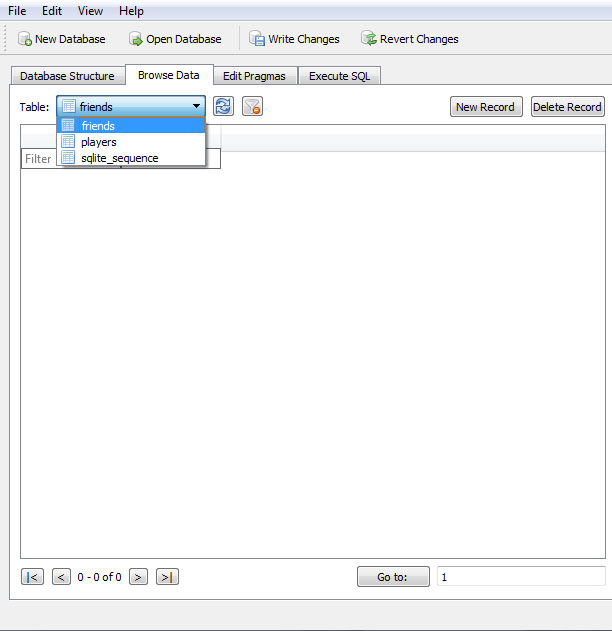
        Debug.Log("You have just created friends tab");
    }// END CreateTable()
img-003

I can explain the code easily:

1. Set the name of the table, the name of the columns, the type of the columns
NOTICE: types can be NULL, INT, TEXT, REAL, BLOG
For more info about datatypes see: https://www.sqlite.org/datatype3.html


var name : String = "friends";
var col = ["Name", "Surname"];
var colType = ["TEXT", "TEXT"];

2. user ‘for’ to create all queries
NOTICE THE ROW: query += “)”;


for(var i=1; i<col.length; i++) {
            query += ", " + col[i] + " " + colType[i];
        }
query += ")";

Populate the DB


// #####################################################################
// INSERT INTO #########################################################
// #####################################################################
// This function insert values inside a table
function InsertInto() { // basic Insert with just values
        // our data
        var query : String;
        query = "INSERT INTO friends VALUES ('Jimi','Hendrix')";
              // INSERT INTO TABLE_NAME VALUES ('Name','Surname');
        dbcmd = dbcon.CreateCommand();
        dbcmd.CommandText = query; 
        reader = dbcmd.ExecuteReader(); 
        Debug.Log("You have just added Jimi Hendrix to friends tab");
    }// END InsertInto()

NOTICE THE APOSTROPHE: (‘Jimi’,’Hendrix’), NOT (Jimi,Hendrix)

If you insert the same data twice into the DB you will see:
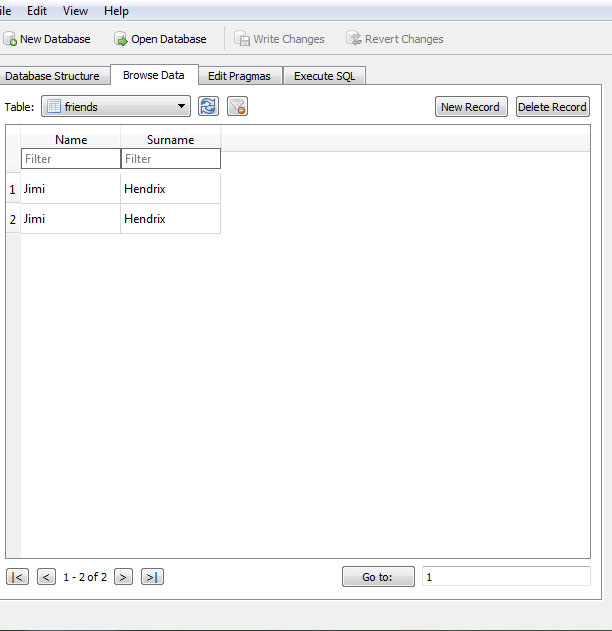
img-004

Read DB content

Using the DB below:

img-005


...
// variables of ShowDatabase ()
var databaseData = new Array();
var textDbContent : UI.Text; // Assign in Inspector

function Start () {
...

// #########################################################################
// READ FULL TABLE #########################################################
// #########################################################################
    // This returns a simple JS Array
    function ReadFullTable(tableName : String) {
        var query : String;
        query = "SELECT * FROM " + tableName;
        dbcmd = dbcon.CreateCommand();
        dbcmd.CommandText = query; 
        reader = dbcmd.ExecuteReader();
        var readArray = new Array();
        while(reader.Read()) { 
            var lineArray = new Array();
            for (var i:int = 0; i < reader.FieldCount; i++)
                lineArray.Add(reader.GetValue(i)); // This reads the entries in a row
            readArray.Add(lineArray); // This makes an array of all the rows
        }
        return readArray; // return matches
    }// END ReadFullTable()
    
	function ShowDatabase (){
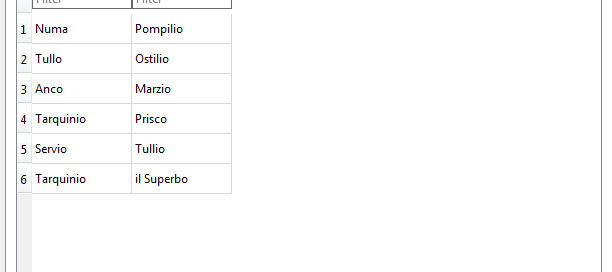
		databaseData = ReadFullTable("friends"); // invia i dati alla funzione per la lettura del DB
		Debug.Log ("This is the array content index 0: " + databaseData[0]); // Numa Pompilio
		Debug.Log ("This is the array content index 1: " + databaseData[1]); // Tullo Ostilio
		Debug.Log ("This is the array content index 2: " + databaseData[2]); // Anco Marzio
		Debug.Log ("This is the array content index 3: " + databaseData[3]); // Tarquinio Prisco
		Debug.Log ("This is the array content index 4: " + databaseData[4]); // Servio Tullio
		Debug.Log ("This is the array content index 5: " + databaseData[5]); // Tarquinio il Superbo
		textDbContent.text = Array(databaseData).ToString(); // Numa,Pompilio,Tullo,Ostilio,Anco,Marzio etc...
}// END ShowDatabase ()

How does it work?

1. Create a UIText> Assign to dbAccess.jstextDbContent> var textDbContent
2. Create UI. Button> Inspector OnClic()> GameController> dbAccess.ShowDatabase
3. Play
4. OnClick() -> ShowDatabase () send the table name ‘friends’ to ReadFullTable(tableName : String)
5. ReadFullTable(tableName : String) return an array
6. ShowDatabase () read the array databaseData

Select DB content WHERE


...
// variables of ShowDatabase ()
var databaseData = new Array();
var textDbContent : UI.Text; // Assign in Inspector

function Start () {
...

// #########################################################################
// READ TABLE WHERE ########################################################
// #########################################################################
    // This returns a simple JS Array
    function ReadTableWhere(tableName : String) {
        var query : String;
        query = "SELECT Surname FROM " + tableName + " WHERE Name='Servio'";
        dbcmd = dbcon.CreateCommand();
        dbcmd.CommandText = query; 
        reader = dbcmd.ExecuteReader();
        var readArray = new Array();
        while(reader.Read()) { 
            var lineArray = new Array();
            for (var i:int = 0; i < reader.FieldCount; i++)
                lineArray.Add(reader.GetValue(i)); // This reads the entries in a row
            readArray.Add(lineArray); // This makes an array of all the rows
        }
        return readArray; // return matches
    }// END ReadFullTable()
    
	function ShowDatabaseWhere (){
		databaseData = ReadTableWhere("friends"); // invia i dati alla funzione per la lettura del DB
		Debug.Log ("This is the array content index 0: " + databaseData[0]); // Tullio
		textDbContent.text = Array(databaseData).ToString(); // Tullio
}// END ShowDatabase ()

NOTICE:


query = "SELECT Surname FROM " + tableName + " WHERE Name='Servio'";
// SELECT Surname FROM friends WHERE Name='Servio'

a common mistake is omit the spaces after FROM or before WHARE as:


query = "SELECT Surname FROM" + tableName + "WHERE Name='Servio'";
// SELECT Surname FROMfriendsWHERE Name='Servio' ---> BAAAAAADDDDDDD!!!!!!

Select DB content ORDER BY


...
// variables of ShowDatabase ()
var databaseData = new Array();
var textDbContent : UI.Text; // Assign in Inspector

function Start () {
...

// #########################################################################
// ORDER BY ################################################################
// #########################################################################
    // This returns a simple JS Array
    function ReadTableOrderBy(tableName : String) {
        var query : String;
        query = "SELECT Surname FROM " + tableName + " ORDER BY Name ASC";
        dbcmd = dbcon.CreateCommand();
        dbcmd.CommandText = query; 
        reader = dbcmd.ExecuteReader();
        var readArray = new Array();
        while(reader.Read()) { 
            var lineArray = new Array();
            for (var i:int = 0; i < reader.FieldCount; i++)
                lineArray.Add(reader.GetValue(i)); // This reads the entries in a row
            readArray.Add(lineArray); // This makes an array of all the rows
        }
        return readArray; // return matches
    }// END ReadFullTable()
    
	function ShowDatabaseOrderBy (){
		databaseData = ReadTableOrderBy("friends"); // invia i dati alla funzione per la lettura del DB
		Debug.Log ("This is the array content index 0: " + databaseData[0]); // Marzio     -> Anco
		Debug.Log ("This is the array content index 1: " + databaseData[1]); // Pompilio   -> Numa
		Debug.Log ("This is the array content index 2: " + databaseData[2]); // Tullio     -> Servio
		Debug.Log ("This is the array content index 3: " + databaseData[3]); // Prisco     -> Tarquinio -> id 4 in DB
		Debug.Log ("This is the array content index 4: " + databaseData[4]); // il superbo -> Tarquinio -> id 6 in DB
		Debug.Log ("This is the array content index 5: " + databaseData[5]); // Ostilio    -> Tullo

		textDbContent.text = Array(databaseData).ToString(); // Tarquinio,Servio,Tarquinio,Numa,Tullo,Anco
}// END ShowDatabase ()

NOTICE:

	
		databaseData[3]); // Prisco     -> Tarquinio -> id 4 in DB
		databaseData[4]); // il superbo -> Tarquinio -> id 6 in DB	

Same Name but different id inside DB.

Close DB


...
// variables of ShowDatabase ()
var databaseData = new Array();
var textDbContent : UI.Text; // Assign in Inspector

function Start () {
...

// #########################################################################
// ORDER BY ################################################################
// #########################################################################
	// This returns a simple JS Array
    function ReadTableOrderBy(tableName : String) {
        var query : String;
        query = "SELECT Surname FROM " + tableName + " ORDER BY Name ASC";
        dbcmd = dbcon.CreateCommand();
        dbcmd.CommandText = query; 
        reader = dbcmd.ExecuteReader();
        var readArray = new Array();
        while(reader.Read()) { 
            var lineArray = new Array();
            for (var i:int = 0; i < reader.FieldCount; i++)
                lineArray.Add(reader.GetValue(i)); // This reads the entries in a row
            readArray.Add(lineArray); // This makes an array of all the rows
        }
        return readArray; // return matches
    }// END ReadFullTable()
    
	function ShowDatabaseOrderBy (){
		databaseData = ReadTableOrderBy("friends"); // invia i dati alla funzione per la lettura del DB
		Debug.Log ("This is the array content index 0: " + databaseData[0]); // Marzio     -> Anco
		Debug.Log ("This is the array content index 1: " + databaseData[1]); // Pompilio   -> Numa
		Debug.Log ("This is the array content index 2: " + databaseData[2]); // Tullio     -> Servio
		Debug.Log ("This is the array content index 3: " + databaseData[3]); // Prisco     -> Tarquinio -> id 4 in DB
		Debug.Log ("This is the array content index 4: " + databaseData[4]); // il superbo -> Tarquinio -> id 6 in DB
		Debug.Log ("This is the array content index 5: " + databaseData[5]); // Ostilio    -> Tullo

		textDbContent.text = Array(databaseData).ToString(); // Tarquinio,Servio,Tarquinio,Numa,Tullo,Anco
		CloseDB(); 
}// END ShowDatabase ()

// #########################################################################
// CLOSE DB ################################################################
// #########################################################################
function CloseDB() {
        reader.Close(); // clean everything up
        reader = null; 
        dbcmd.Dispose(); 
        dbcmd = null; 
        dbcon.Close(); 
        dbcon = null; 
        Debug.Log("DB Closed");
    }// END CloseDB()

References:
http://forum.unity3d.com/threads/unity-3d-android-sqlite-examples.114660/ -> very easy to understand C#
http://wiki.unity3d.com/index.php/SQLite -> complete JS classes
http://sysmagazine.com/posts/181239/
http://answers.unity3d.com/questions/188334/unity-sql-database.html

By |Unity3D, Video Games Development|Commenti disabilitati su Unity – Local Data Base – SQLite – JavaScript

How to monetize an Indie Videogame

Have you just developed your first indie videogame? Good! But now we have to monetize!

Begin your marketing campaign the moment you have something that illustrates the fundamental mechanics and look of your game.

Splash Page

Create your videogame splash page, it will be your most important marketing tool!
You need some images, a video trailer and a brief presentation, your contacts and a giant download button :)
Be social! It is important to collect fans, to start you have to create a facebook and twitter pages.

Press Kit

Create for your Game journalists ready to use materials:

– Relevant Screenshots
– Video
– Press Coverage
– Game Info Sheet
– Fact Sheet
– Logos and Awards

To create apress kit see http://dopresskit.com/ also.

Where can I self promote?

During the development process, my advice is post your WIP (work in progress) inside forums and social media group for developers.
There are a lot of nice people here that can give you constructive opinions about content, graphic, music and appeal.
If you are a lucky guy, you may be contacted by an editor before even finish the game.

A good place to self promotion is:

– http://www.gamasutra.com/
– http://indiemegabooth.com/
– http://www.reddit.com/r/indiegaming
– http://www.indiecade.com/
– http://www.rockpapershotgun.com/
– http://kotaku.com/
– http://indiegames.com/index.html
– http://www.cinemablend.com/games/
– http://www.tigsource.com/
– http://indiegamemag.com/
– http://www.pcgamesn.com/indie
– http://theindiemine.com/
– http://indiegamerchick.com/
– http://gamejolt.com/
– http://www.indieteamup.com/
– http://www.gamespress.com/
– http://www.nomsg.net/
– http://videogamecaster.com/

Cross Promotion

– http://moregamers.com/

Game Jam

– http://globalgamejam.org/
– http://nordicgamejam.org/
– http://www.orcajam.com/
– http://www.tojam.ca/home/default.asp
– http://www.trianglegamejam.com/

Find a Publisher

Try to find a publisher, you can have a direct contact with him using his website.
Remember, the best practice is obtain a minimum of royalty in advance or sign a good contract flat fee.

Here a list a publisher fro Wikipedia:
– http://en.wikipedia.org/wiki/List_of_video_game_publishers

3D RAZA

– http://www.3draza.com

Type: Publisher finding

It connect your productions with large video game publishers who also distribute the games.
Videogame projects are revised case by case.
In exchange for the videogame publishing and distribution, they will take 15% of the game sales.

Steam

– http://www.steampowered.com/steamworks/FAQ.php
– http://steamcommunity.com/greenlight/ (great exposition here)

Type: publisher

Now your game can take advantage of a gaming platform that has over 40 million players worldwide and spans multiple systems.

It’s free: There’s no charge for bandwidth, updating, or activation of copies at retail or from third-party digital distributors.

It’s freeing: With Steamworks you avoid the overhead and delay of certification requirements—there are none. Distribute your game on your terms, updating it when and as often as you want

Ad Sense

– http://www.google.com/adsense/start/

Type: Pay per click

Ad Sense program of Google can be a good way to earn money, but you need a lot of users.
Ad Sense works well with Google Analitycs and other Web Master Tools of Google.
ADS can turn off users alot if you abuse of that.

Revenue: Ad Sense will pay you per click, 1000 impressions can return about 1 USD.

skillz – eSports for Everyone

– http://skillz.com/

Type: Play for cash

Skillz is the first cash competition platform for mobile games.

Skillz is the only place where you can win bragging rights and real money by playing your favorite mobile games. Compete against friends and rivals in exciting multiplayer competitions and show off your skills today!

How does it worK:
1. Create a free Skillz account and use it to log in to your favorite Skillz-enabled game.
2. Practice by playing for Z, the Skillz virtual currency. When you’re ready to win real money, enter a cash competition!
3. Get match results and collect your prize as soon as you and your opponents are done playing. You can withdraw your winnings anytime.

Revenue: enabling pay-to-play cash tournaments. Monetize gamers in a way that aligns with their competitive nature.

– http://cashplay.co/

Type: Play for cash

Integration of the Cashplay platform is simple and typically takes no longer than two days of programing for a mobile game integration. Cashplay currently supports games developed for iOS, Android and Unity.

Cashplay offers developers a completely new way to generate additional revenue from their mobile games via offering player vs. player cash tournaments.

Revenue: game developers who integrate Cashplay are rewarded on a revenue share basis meaning that you can earn up to 60% of the profit generated from every single completed cash tournament or challenge.

FGL

https://www.fgl.com

Type: sponsorship – publishing – monetize

Over 7,000 publishers are on FGL looking to buy HTML5, Android, iOS, Unity and Flash games right now.

Beefjack Promote

– http://promote.beefjack.com/

Type: sponsorship – publishing – monetize

Seriouslyweb

– http://seriouslyweb.com/services/indie-game-marketing

Type: sponsorship – publishing – monetize

Crowd funding

Crowdfunding is the practice of funding a project or venture by raising monetary contributions from a large number of people, typically via the internet. If you want find investors you will need a great presentation with the best graphic, cool characters, good music.
A video will be more effective of thousands of written words!

– https://www.kickstarter.com/
– https://www.indiegogo.com/
– http://epocu.com/

Alphafunding

This allows you to get your game out into the public eye before its released, and maybe make a few bucks in the process.

– http://www.desura.com/

Free-to-play

Create a Free-to-play game, find thousands of users and add pay items, props or quest.
This is the way of Dota2, Tera on Line, League of Legends and others.
Inside Tera on Line, a free fantasy MMORPG there are a lot of packs from 4 USD to 50 USD to make your character cool ;p
Walking in Tera I have seen a lot of customized characters, I think some characters have at least $ 100 of cosmetics!

IMO monetize a F2P game is a fascinating process that involves psychology, art and UXD (User Interface Design)

Psychology and Free-to-Play

– Flow Theory
Introduced by Mihaly Csikszentmihalyi, flow theory is something all gamers have been through. It’s that feeling of being fully immersed in a game not knowing how much time has passed.
Flow theory can be defined as a state of positive immersion in an activity. Its components are full absorption in that activity, clear goals, a high degree of concentration, and a distorted sense of time.
This is the state that can lead to impulse purchases.

– Impulse Purchases
Purchasing virtual goods largely relies on impulse buying, as there is little planning involved. Players usually purchase virtual goods after playing the game a certain amount of time and this differs for each game.

Virtual Goods

– Vanity Items
Vanity items provide purely aesthetic purposes, such as items that can change the look of an in-game avatar.

– Power Enhancements
Power enhancing items elevate the player’s abilities in the game, and therefore affect game play overall.

– Boosts
Boosts accelerate progression or make the game easier to play by speeding up game play elements, such as getting experiance point inside and RPG

– Consumables
gThey give the player the same kinds of upgrades

– Monetization Strategies
Now that we know what to sell, how do we sell it? The most basic necessity is having multiple ways to pay to remove any friction and help increase conversion of non-paying to paying players. The longer a user plays, the more likely they will pay. Other strategies include having a store that’s simple to navigate and constantly checking metrics.

Subscription Fees
Offering subscriptions can be part of almost any monetization strategy, and it offers great flexibility. Subscribers are power users.
Offering discounts, giving hard currency each month, having subscriber-only events, these are all ways to create more value and give players incentive to become subscribers.

By |Video Games Development, Web Business|Commenti disabilitati su How to monetize an Indie Videogame

Unity3D – Tutorials – UI – Input Field – JS

Unity3D – Tutorials – UI – Input Field – JS

The new UI system give us a new Input Field, in this tutorials we are going to create a responsive ‘Input Field’ in the middle of the screen, get the user input and render it over a label.

Create a scene with:

– Main Camera

– Canvas
-> InputField
->> Placeholder
->> Text (the text of InputField)
-> Text (a label)

– EventSystem

– GameControl (Empty)

Hierarchy> Canvas> Inspector> Canvas Scaler (Script):
– Reference Resolution: X=800 Y=600
– Screen Marìtch Mode: Match Width Or Height

Hierarchy> InputField> Inspector
> Rect Transform
– Pos X=0 Y=0 Z=0
– Width= 200 Height=30
> Input Field (Script)
– Character Limit = 10 (max 10 characters allowed)

Hierarchy> InputField> Placeholder> Inspector
> Text (Script)
– Text= ‘Enter your name…, max 10 characters’

Hierchy> Text (a label)> Inspector
> Rect Transform>
– Pos X=0 Y=0 Z=0
– Width= 100 Height=100

> Text (Script)
– Text= ‘Your name here’

Now we will see in the middle of the screen:

Your name here -> (label)
|Enter your name…, max 10 characters | -> (Input Field)

Attach to GameController gameobject GameControllerScript.js:


#pragma strict
 
var MyInputField : UI.InputField; // ASSIGN IN INSPECTOR the InputField 
var TextGetInputField : UI.Text; // ASSIGN IN INSPECTOR the text of InputField
var TextLabel: UI.Text; // ASSIGN IN INSPECTOR the text of the label
 
function Awake () {
}// END Awake()
 
function Start () {
        // Focus on InputField if doesn't make sense to force the user to click on it.
	MyInputField.ActivateInputField();
	MyInputField.Select();
}// END Start()
 
function Update () {
	TextLabel.text = 'Your name is: ' + TextGetInputField.text;
}// END Update()

Hierarchy> Canvas/InputField> DRAG AND DROP over var MyInputField
Hierarchy> Canvas/InputField/Text> DRAG AND DROP over var TextGetInputField
Hierarchy> Canvas/Text> DRAG AND DROP over var TextLabel

Play and enjoy!

I like group all UI game objects in a single script, getting they from Inspector, in my opinion it is the easy way to manage a lot of text.

Reference: http://docs.unity3d.com/460/Documentation/ScriptReference/UI.InputField.html

By |Unity3D, Video Games Development|Commenti disabilitati su Unity3D – Tutorials – UI – Input Field – JS