Luce Digitale

Let’s start with node.js

This is a practical course using node.js anda localhost development environment.

With node.js you can use js syntax to drive a server backend.

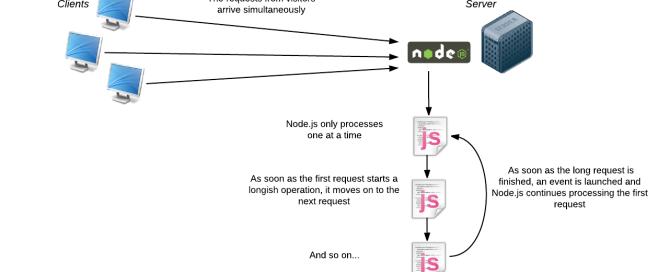
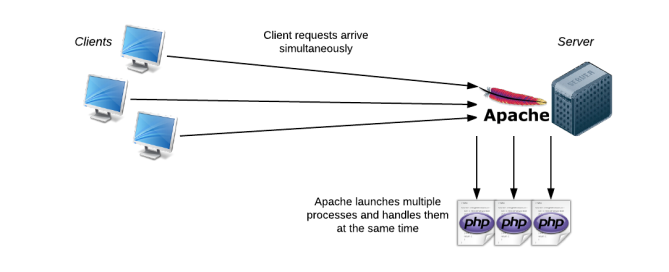
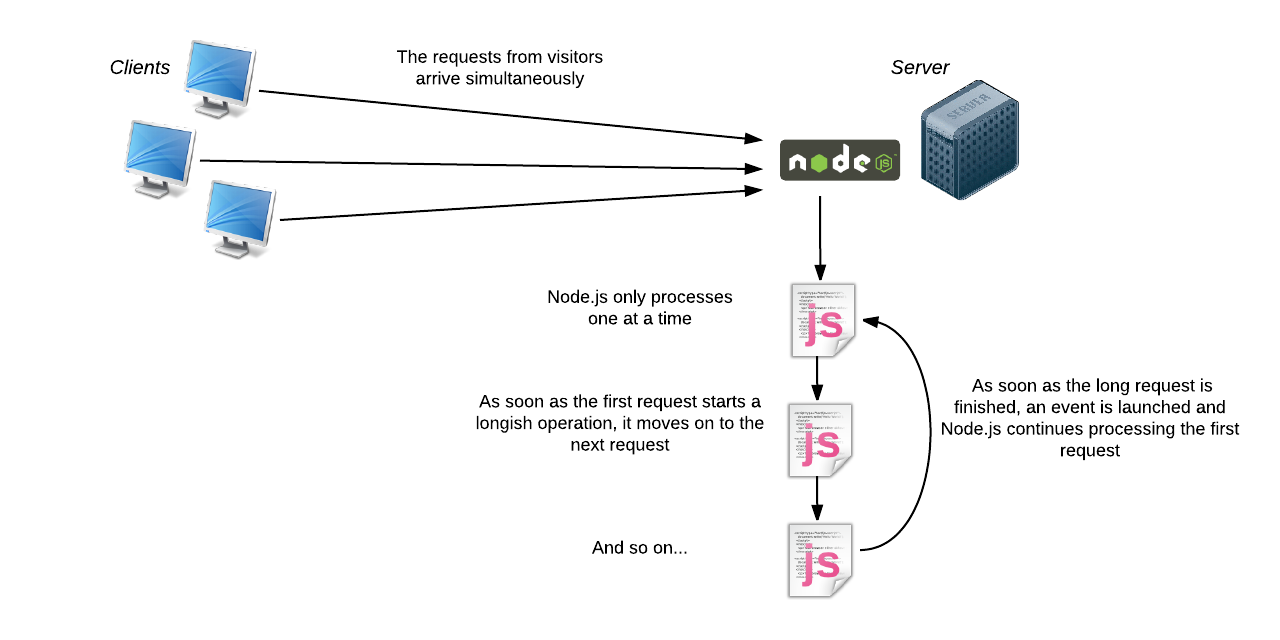
Under you can see the difference between node.js and PHP, PHP is multithread, node.js may be monothread, but it is flexible because of events.

nodejs-monothread

php-multithead

For local development I use Laragon (https://laragon.org/), it is really well organized, easy to use and portable, there are alternative, you can try Bitnami (https://bitnami.com/) or if you are skilled Docker (https://www.docker.com/), this time I’ll proceed with Laragon.

Download Laragon – Full, is has already the latest node.js stabe edition inside, double click the Laragon icon and Start all services
If you are under Windows you will see a Windows Command Processor message, ignore it.

1. Create a new folder inside laragon/www directory, my folder is nodejs
2. Then go inside laragon/www/nodejs and create the file server.js

var http = require('http');

var server = http.createServer(function(req, res) {
res.writeHead(200, {"Content-Type": "text/html"});
res.write('<!DOCTYPE html>'+
'<html>'+
' <head>'+
' <meta charset="utf-8" />'+
' <title>My Node.js page!</title>'+
' </head>'+ 
' <body>'+
' <p>Here is a paragraph of <strong>HTML</strong>!</p>'+
' </body>'+
'</html>');
res.end();
});
server.listen(8080);

With node.js you need to initialize a server, follow me now:

Load the module using require(‘http’); and create a server using the module http.createServer, a module is the same as JavaScript libraries

var http = require('http');
http.createServer(function(req, res)...

The page in the server in a ime type html (https://developer.mozilla.org/en-US/docs/Web/HTTP/Basics_of_HTTP/MIME_types)

res.writeHead(200, {"Content-Type": "text/html"});

Write the content of the page

res.write('<!DOCTYPE html>'+
'<html>'+...

You set the server at port 8080, you can assign any number you want (https://en.wikipedia.org/wiki/Port_(computer_networking))

server.listen(8080);

3. Run the Laragon terminal console INSIDE laragon/www/nodejs and type:
node server.js
The console doesn’t display anything and doesn’t respond – that’s totally normal, we are just started the server

4. Open your browser and go to the address http://localhost:8080.
This connect your own machine to the 8080 port on which the Node.js program is running.
In the browser you will se the render of an html page 😀

5. Change the code of server.js

' <p>Here is a paragraph of <strong>HTML</strong>! I have just changed this code</p>'+

6. Run the Laragon terminal console INSIDE laragon/www/nodejs and type:
a. CTRL+C this will stop the server
b. node server.js restart the server to get the changes

7. Reload http://localhost:8080 to render in the page the changes

8. Change the code of node.js

var http = require('http');
var url = require('url');

var server = http.createServer(function(req, res) {
var page = url.parse(req.url).pathname;
console.log(page);
res.writeHead(200, {"Content-Type": "text/plain"});
if (page == '/') {
res.write('You\'re in the home page');
}
else if (page == '/pageone') {
res.write('You\'re in page one!');
}
else if (page == '/pageone/subpageone') {
res.write('Hey, this is a subpage of pageone');
}
res.end();
});
server.listen(8080);

I will explain:

a. Get the url from the browser var url…
b. Parse the url var page…
c. if page==… write different code

...
var url = require('url');
...
var page = url.parse(req.url).pathname;

Stop e restart the server, type in the browser:
http://localhost:8080
http://localhost:8080/pageone
http://localhost:8080/pageone/subpage

9. Change the code another time:

var http = require('http');
var url = require('url');
var querystring = require('querystring');

var server = http.createServer(function(req, res) {
var page = url.parse(req.url).pathname;
var params = querystring.parse(url.parse(req.url).query);
console.log(page);
res.writeHead(200, {"Content-Type": "text/plain"});
	// parse query ################################################################
    if ('firstname' in params && 'lastname' in params) {
        res.write('Your name is ' + params['firstname'] + ' ' + params['lastname'] + '\r\n');
    }
    else {
        res.write('You do not have name AND surname' + '\r\n');
    }
	// parse url ##################################################################
	if (page == '/') {
		res.write('You\'re in the home page');
	}
	else if (page == '/pageone') {
		res.write('You\'re in page one!');
	}
	else if (page == '/pageone/subpageone') {
		res.write('Hey, this is a subpage of pageone');
	}
res.end();
});
server.listen(8080);

Stop and restart the server and in the browser type http://localhost:8080?firstname=John&lastname=Doe to see the result:

Your name is John Doe
You’re in the home page

Stop and restart the server and in the browser type http://localhost:8080?firstname=John&lastname=Doe to see the result:

You do not have name AND surname
You’re in the home page

10. Now I’ll create my own personal module, then go inside laragon/www/nodejs and create the file dtmodule.js

// Use the exports keyword to make properties and methods available outside the module file
exports.myDateTime = function () {
  return Date();
}; 

Change server.js

var http = require('http');
var url = require('url');
var querystring = require('querystring');

var dtmodule = require('./dtmodule.js'); // require my personal module
// Notice that we use ./ to locate the module, that means that the module is located in the same folder as server.js

var server = http.createServer(function(req, res) {
var page = url.parse(req.url).pathname;
var params = querystring.parse(url.parse(req.url).query);
console.log(page);
res.writeHead(200, {"Content-Type": "text/plain"});
	// parse query ################################################################
    if ('firstname' in params && 'lastname' in params) {
        res.write('Your name is ' + params['firstname'] + ' ' + params['lastname'] + '\r\n');
    }
    else {
        res.write('You do not have name AND surname' + '\r\n');
    }
	// parse url ##################################################################
	if (page == '/') {
		res.write('You\'re in the home page');
	        res.write("\r\nThe date and time are currently: " + dtmodule.myDateTime());
	}
	else if (page == '/pageone') {
		res.write('You\'re in page one!');
	}
	else if (page == '/pageone/subpageone') {
		res.write('Hey, this is a subpage of pageone');
	}
res.end();
});
server.listen(8080);

a. Load my own personal module var dtmodule = require(‘./dtmodule.js’);
b. Use the function inside res.write(“\r\nThe date and time are currently: ” + dtmodule.myDateTime());

Stop and restart the server and you will see at http://localhost:8080/

You do not have name AND surname
You’re in the home page
The date and time are currently: Tue Mar 31 2020 13:13:58 GMT+0200 (GMT+02:00)

By |NodeJS|Commenti disabilitati su Let’s start with node.js

Symfony 1.4.20 Sessions Storage

Variabili di Sessione

Symfony facilita il salvataggio nelle varibili di sessione php tramite l’utilizzo della classe – sfUser –
in particolare:


// Per sfActions

$this->getUser()->setAttribute('nomevariabile', valore)
$this->getUser()->getAttribute('nomevariabile',se la variabile non esiste)

$this->getUser()->getAttributeHolder()->remove('nomevariabile');
$this->getUser()->getAttributeHolder()->clear();

// dal Template
$sf_user->getAttribute('nomevariabile')

Un esempio pratico:

actions.class.php


<?php
 
class contenutoActions extends sfActions // estende la classe Symfony
{ 
  public function executeFirstpage($request)// http://localhost/jobeet/web/frontend_dev.php/contenuto/firstpage
  {
    $nickname = 'Andrea';
 
    // 1. Salva nella sessione la variabile nickname con il valore Andrea
    // getUser()->setAttribute è un metodo della classe Symfony sfUser
    $this->getUser()->setAttribute('nickname', $nickname);
    return $this->renderText('Salvata la variabile di sessione nickname= '. $nickname);
  }
 
  public function executeSecondpage() // http://localhost/jobeet/web/frontend_dev.php/contenuto/secondpage
  {
    // 2. Carica la variabile di sessione nickname
    // getUser()->getAttribute è un metodo della classe Symfony sfUser
    //                                          variabile, se la variabile non esiste
    $nickname = $this->getUser()->getAttribute('nickname', 'Visitatore Anonimo');
    return $this->renderText($nickname); // render della variabile o di 'Visitatore Anonimo'
  }
  
  public function executeThirdpage() // http://localhost/jobeet/web/frontend_dev.php/contenuto/thirdpage
  {
    // richiama il template che carica direttamente dal suo interno la variabile di sessione
  }
  
  public function executeRemovenickname() // http://localhost/jobeet/web/frontend_dev.php/contenuto/removenickname
  {
    // getUser()->getAttributeHolder() è il contenitore di tutti i parametri
    // rimuove solo la variabile nickname
    $this->getUser()->getAttributeHolder()->remove('nickname');
    return $this->renderText('Rimosso nickname');
  }
 
  public function executeCleanup() // http://localhost/jobeet/web/frontend_dev.php/contenuto/cleanup
    // rimuove tutte le variabili di sessione
    $this->getUser()->getAttributeHolder()->clear();
    return $this->renderText('Rimosse tutte le variabili di sessione');
  }
}// END class

thirdpageSuccess.php


Hello, <?php echo $sf_user->getAttribute('nickname') ?>

Variabili di Sessione Flash

Symfony memorizza in sessione anche dei dati che definisce flash.
Le variabili flash vengono automaticamente cancellate dopo essere state caricate, non è necessario eliminarle esplicitamente dalla sessione.

actions.class.php


<?php
 
class contenutoActions extends sfActions // estende la classe Symfony
{ 
  public function executeThirdpage() // http://localhost/jobeet/web/frontend_dev.php/contenuto/thirdpage
  {
      $value = 'Questa è una nota Flash';
      $this->getUser()->setFlash('notice', $value);
  }
  
}// END class

thirdpageSuccess.php


<?php echo $sf_user->getFlash('notice') ?>

Ref: http://symfony.com/legacy/doc/gentle-introduction/1_4/it/06-Inside-the-Controller-Layer

By |PHP, Symfony, Web Design|Commenti disabilitati su Symfony 1.4.20 Sessions Storage

Symfony 1.4.22 – Controller – Actions – preExecute – execute – postExecute – CustomMethod

Symfony mette a dispossizione dei metodi speciali all’interno della classe sfActions per dare un ordine di esecuzione particolare alle nostre operazioni.

apps/frontend/modules/contenuto/actions/actions.class.php


<?php
 
class contenutoActions extends sfActions // estende la classe Symfony
{
  public function preExecute()
  {
    // 1. Il codice inserito qui viene eseguito all'inizio di ogni azione
    echo "Codice di preExecute<br>";
  }
    
  public function executePageone($request) // http://localhost/jobeet/web/frontend_dev.php/contenuto/pageone
  {
      $this->myCustomMethod();  // I metodi della classe azione sono accessibili
      
      return $this->renderText("Codice di executePageone<br>"); // 4. ultimo ad essere eseguito
  }
  
  public function postExecute()
  {
    // 3. Il codice inserito qui viene eseguito alla fine di ogni azione
    echo "Codice di postExecute<br>";
  }
 
  protected function myCustomMethod()
  {
    // 2. È possibile aggiungere i propri metodi, ammesso che non inizino con "execute"
    // In questo caso è consigliabile dichiararli protetti o privati
    echo "Codice di myCustomMethod<br>";
  }
}// END class

Renderizza:

Codice di preExecute
Codice di myCustomMethod
Codice di postExecute
Codice di executePageone

Reference:
http://symfony.com/legacy/doc/gentle-introduction/1_4/it/06-Inside-the-Controller-Layer

By |PHP, Symfony, Web Design|Commenti disabilitati su Symfony 1.4.22 – Controller – Actions – preExecute – execute – postExecute – CustomMethod

Symfony 1.4.22 – Controller – Actions – Basics Concepts – sfView

In Symfony 1.4.22 le azioni caricano i modelli e definiscono le viste gestendo tutta la logica dell’applicazione web.

Identazione e Convenzioni

Per convenzione per l’identazione del codice non utilizziamo tabulazioni ma un doppio spazio.

Il codice php deve essere

File Singoli o più Files

Le azioni possono essere racchiuse in un file singolo:

frontend/modules/miomodulo/actions/actions.class.php


class miomoduloActions extends sfActions
{
  public function executeIndex($request)
  {
    // ...
  }
 
  public function executeList($request)
  {
    // ...
  }
}

o divise in più file:

frontend/modules/miomodulo/actions/indexAction.class.php


class indexAction extends sfAction
{
  public function execute($request)
  {
    // ...
  }
}

frontend/modules/miomodulo/actions/listAction.class.php


class listAction extends sfAction
{
  public function execute($request)
  {
    // ...
  }
}

Notare come il nome dei file e delle classi sono correlati.

sfView

Un metodo nomeAction deve sempre finire con un return verso la vista.

Creiamo:
apps/modules/contenuto/templates/pageoneSuccess.php -> operazioni avvenute con successo
apps/modules/contenuto/templates/pageoneError.php -> operazioni errate
apps/modules/contenuto/templates/pageoneMyresult.php -> operazioni con un mio risultato personalizzato

apps/modules/contenuto/templates/pagetwoSuccess.php -> operazioni avvenute con successo con template diverso

apps/modules/contenuto/actions/actions.class.php


<?php
 
class contenutoActions extends sfActions // estende la classe Symfony
{
  public function executePageone($request) // http://localhost/jobeet/web/frontend_dev.php/contenuto/pageone
    {
    
       // return sfView::SUCCESS;
       // return sfView::ERROR;
       // return 'Myresult';

       // $this->setTemplate('pagetwo'); // nome template senza il suffisso Success
      
       // $this->getResponse()->setContent("<html><body>Hello, World!</body></html>");
       // return sfView::NONE;
       
       // return $this->renderText("<html><body>Hello, World!</body></html>");
    }
}// END class

Vediamo caso per caso:

se metto il return -> punta per default pageoneSuccess.php
return sfView::SUCCESS; -> pageoneSuccess.php
return sfView::ERROR; -> pageoneError.php
return ‘Myresult’; -> pageoneMyresult.php
$this->setTemplate(‘pagetwo’); -> pagetwoSuccess.php

Termina col render Hello world, no vista.
$this->getResponse()->setContent(“Hello, World!“);
return sfView::NONE;

Termina con il render ‘Hello world’, no vista
return $this->renderText(“Hello, World!“);

Reference:
http://symfony.com/legacy/doc/gentle-introduction/1_4/it/06-Inside-the-Controller-Layer

By |PHP, Symfony, Web Design|Commenti disabilitati su Symfony 1.4.22 – Controller – Actions – Basics Concepts – sfView

Symfony – Classi – Caricamento Automatico

In un progetto Symfony 1.4.22 è sconsigliato l’utilizzo dell’istruzione PHP – include_once –

Un esempio in plain PHP:


include_once 'classes/MyClass.php'; // carica la classe php
$myObject = new MyClass();

Symfony caricherà in automatico le classi contenute nei file PHP all’interno di:
apps/frontend/lib/miaClasse.class.php (il file deve terminare con .class.php)

Segue un esempio:

apps/frontend/lib/miaClasse.class.php


<?php

class miaClasse {
        // variabili membro o meglio proprietà
        public $a = 10;
        public $b = 20;
          
        // funzioni o meglio metodi
        public function sayHello() {
                echo "Hello! ";
        }
}

apps/frontend/modules/contenuto/actions/actions.class.php


<?php

class contenutoActions extends sfActions // estende la classe Symfony
{
  public function executePageone($request) // crea la pagina http://localhost/jobeet/web/contenuto/pageone
    {
        // DEVO dichiarare l'istanza, istanza cioè una copia di MyClass
        $miaClasse_1 = new miaClasse();
        // richiama MyClass ed avvia la funzione sayHello() - stampa "Hello!"
        $miaClasse_1->sayHello();
        
        $miaClasse_2 = new miaClasse();
        $miaClasse_2->a = 20; // invia un valore ad a
  echo  $miaClasse_2->a; // stampa 20  
    }
}// END class

apps/frontend/modules/templates/pageoneSuccess.php


<p>Template di Page One</p>

Puntare il browser a: http://localhost/jobeet/web/frontend_dev.php/contenuto/pageone

Stampa:

Hello! 20
Template di Page One

By |PHP, Symfony, Web Design|Commenti disabilitati su Symfony – Classi – Caricamento Automatico