creazioni siti web rovigo

Grand Tour Project – The most beautiful cities of Italy in your pocket

App Review: Grand Tour Project – The most beautiful cities of Italy in your pocket!
OS: Android 4.0 or over

It’s the goal that a small italian development team accomplishes with its brand new software product.
Grand Tour Project is the App that accompanies tourists during their visit to Italy and lets them fully enjoy their time in the “Bel Paese”.
The App is also dedicated to those who want to enjoy the beauties of Italy while sitting on their couch.

The application allows users to buy a series of high-quality video documentaries filmed in HD and tailored for this very purpose. It has been developed for smartphones and tablets.
The main characters are the most beautiful monuments of Italy, the most incredible places and the most curious facts, all described with the highest attention to historical details. Supported by 3D rendered animations and original musics, the Grand Tour Project delivers the user an immersive experience to dive in.

The guides are available in different resolutions so they can be played on several devices, in various languages (English, Italian, French and German) and are all subtitled in order to meet the needs of hearing impaired people.

The Italian development team includes experts in art and history, photography and programming with a common denominator: a boundless love for Italy and its wonders. The app is available now on Google Play Store and Amazon AppStore at the links below.

Google Play: http://bit.ly/grandtourproject
Amazon: http://bit.ly/Amazon_GTP_USA
Facebook: https://www.facebook.com/GrandtourProject
Twitter: https://twitter.com/GrandTourPrj
Google Plus: https://plus.google.com/+Grandtourproject_ITA/
Website: http://www.grandtourproject.com/blog/
Youtube: http://bit.ly/GTP_YouTube
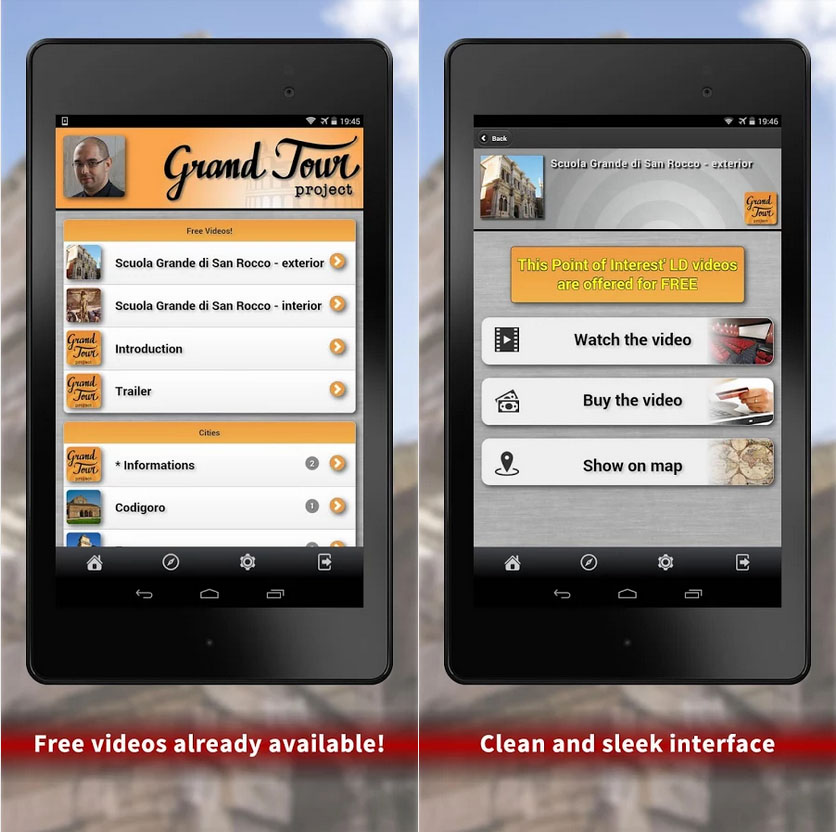
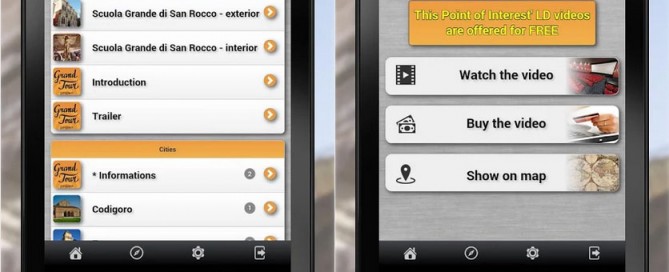
Some Screenshots:

gtproject

By |Web Design|Commenti disabilitati su Grand Tour Project – The most beautiful cities of Italy in your pocket

Get Component – Script from Another Object

Get Component – Script from Another Object

Create a new scene with:

1. Camera

2. GUI Text

3. Cube, attach ‘CubeScript.js’


#pragma strict

// private per nasconderla in Inspector: nome dello script da prelevare
private var gameController : GameControllerScript;

function Start () {
    // inserisco in una variabile l'oggetto con tag GameController
    var gameControllerObject : GameObject = GameObject.FindWithTag ("GameController");
    // se l'oggetto con tag GameController esiste inserisco in una variabile il componente GameControllerScript.js
    if (gameControllerObject != null)
    {
        gameController = gameControllerObject.GetComponent (GameControllerScript);
    }
    // se l'oggetto con tag GameController non esiste restituisce un messaggio di errore
    if (gameControllerObject == null)
    {
        Debug.Log ("Cannot find 'GameControllerScript.js' script");
    }
}

function Update () {
}


function OnMouseDown ()
{
        // When you click over the object
        Debug.Log('clicked'); // Debug Code, remove in the end
        // invia a GameControllerScript.js, alla funzione TextUpdate() la variabile myNewTextValue
        var myNewTextValue : int = 2;
        gameController.TextUpdate (myNewTextValue);
}

4. Empty Object:

a. name it ‘GameController’
b. tag it ‘GameController’
c. Transform> Reset, it resets the position at 0,0,0
d. attach ‘GameControllerScript.js’


#pragma strict

var mytext : GUIText; // Assign it in Inspector
private var myTextValue : int; // hide it in Inspector, we want drive it only via code!

function Start () {
// give them an initial value when the game starts
mytext.text = "First text"; 
myTextValue = 1;
}

function Update () {
}


function TextUpdate (myNewTextValue : int) {
if (myNewTextValue == 2)
    {
        // play the track 1, volume 0-1
        mytext.text = "Second text";
    }
    // if (trackValue == 2) -> it will play track 2 and so on...
}

e. Inspector> ‘GameControllerScript.js’ assign the GUIText into var slot

5. Play, when you click over the Cube the GuiText changes!

For italian people: Come funziona?

1. ‘CubeScript.js’ controlla l’esistenza di GameController(oggetto)
2. se esiste ottiene da GameController(oggetto) il componente ‘GameControllerScript.js’
3. invia al click del mouse a GameControllerScript.js> funzione TextUpdate() un valore
4. ‘GameControllerScript.js’ riceve questo valore e cambia la stringa di testo.

By |Unity3D, Video Games Development|Commenti disabilitati su Get Component – Script from Another Object

Unity 3D Game Engine – Materials – Fade Between 2 Materials

Unity 3D Game Engine – Materials – Switch Materials

1. Project> RMB> Create> Material> Create: material1 and material2

2. MAIN TOP MENU> Gameobject> Create Other> Cube, assign the script:

SwitchMaterial.JS


#pragma strict

	var material1 : Material; // assign in Inspector
	var material2 : Material; // assign in Inspector
	var transitionTime = 2.0;

	function Start () {
	}

	function Update () {
	ChangeMaterial();
	
	}
	
	function ChangeMaterial () {
		renderer.material = material1;
		yield WaitForSeconds (transitionTime); // wait seconds... -> non può essere inserito all'interno di Update()
		renderer.material = material2;         // switch to material2
		
	}

3. Project DRAG AND DROP material1 and material2 over Inspector> SwitchMaterial.JS> material1 slot | material2 slot

By |Unity3D, Video Games Development|Commenti disabilitati su Unity 3D Game Engine – Materials – Fade Between 2 Materials

Unity 3D Game Engine – Load Next Level

Unity 3D Game Engine – Load Next Level

Syntax:


// Load the level named "level2".
Application.LoadLevel ("level2");

// Load the level index 1, 
// you find this value inside Buil Settings> 'Scenes in Build'
Application.LoadLevel (1);    

To improve performance a big game is broken over many levels.
Inside Unity3D you can use Scenes to create levels.

1. MAIN TOP MENU> File> New Scene, create 2 scenes: level1 and level2
2. Project window> DOUBLE CLICK over level1 to select the scene
3. MAIN TOP MENU> GameObject> Create Empty ‘GameController’> Inspector> ‘Add Component’> GameController.JS


#pragma strict

var scores : int;

function Start () {
scores = 10;

}

// On Click Counter START #########################
//This is the variable we are using to store the number of clicks
var clickCounter: int;
//This creates a button and adds +1 to clickCounter variable every 1 click
function OnGUI () {
    if (GUI.Button (Rect (10,10,150,100), "You clicked:" + clickCounter)) {
        clickCounter ++;        
    }
}
// On Click Counter END ###########################

function Update () {

   if (clickCounter > 10) {
    scores = 20;
    // Load the level named "level2".
	Application.LoadLevel ("level2");       
    }

} // END Update

4. MAIN TOP MENU> File> Buil Settings> DRAG AND DROP level1 and level2 scenes over ‘Scenes in Build’ window
Add the scenes into Build or Application.LoadLevel (“level2”); will not work!

When you click 11 times over the GUI.Button, level2 will be loaded.

By |Unity3D, Video Games Development|Commenti disabilitati su Unity 3D Game Engine – Load Next Level

Unity 3D Game Engine – Android – Accelerometer – RAW Data – Translate and Object

Unity 3D Game Engine – Android – Accelerometer – RAW Data – Translate and Object

Inside Hierarchy create:

– Main Camera
– GUI Text X
– GUI Text Y
– GUI Text Z
– Cube (Game Object), attach ‘AccelerometerTest.js’

AccelerometerTest.js


#pragma strict

// Hierarchy DRAG E DROP over var GUI Text in Inspector
var scoreTextX : GUIText;
var scoreTextY : GUIText;
var scoreTextZ : GUIText;

	function Update () {
		var dir : Vector3 = Vector3.zero; // Shorthand for writing Vector3(0, 0, 0)
		
		dir.x = Input.acceleration.x;
		dir.y = Input.acceleration.y;
		dir.z = Input.acceleration.z;
		
		scoreTextX.text = "acceleration.x: "  + dir.x;
		scoreTextY.text = "acceleration.y: "  + dir.y;
		scoreTextZ.text = "acceleration.z: "  + dir.z;
		
	}

Hierarchy> Cube> Inspector> AccelerometerTest.js assign GUI Text to public var scoreText

Here the final result:

dir.x = Input.acceleration.x; from 1 to -1 -> example: 0.1234567 or -0.1234567
dir.y = Input.acceleration.y; from 1 to -1
dir.z = Input.acceleration.z; from 1 to -1

unity-001

unity-002

unity-003

To translate the Cube using Accelerometer data (basic):

AccelerometerTest.js


#pragma strict

function Update () 
{
    transform.Translate(Input.acceleration.x, 0, -Input.acceleration.z);
}

To translate the Cube using Accelerometer data (advanced):

AccelerometerTest.js


#pragma strict

	// Move object using accelerometer
	var speed = 10.0;

// Hierarchy DRAG E DROP over var GUI Text in Inspector
var scoreTextX : GUIText;

	function Update () {
		var dir : Vector3 = Vector3.zero; // Shorthand for writing Vector3(0, 0, 0)
		
		dir.x = Input.acceleration.x;
		
		scoreTextX.text = "acceleration.x: "  + dir.x;
		
		// clamp acceleration vector to unit sphere
		if (dir.sqrMagnitude > 1)
			dir.Normalize();
		
		// Make it move 10 meters per second instead of 10 meters per frame...
		dir *= Time.deltaTime;
			
		// Move object
		transform.Translate (dir * speed);
		
	}

unity-004

By |Unity3D, Video Games Development|Commenti disabilitati su Unity 3D Game Engine – Android – Accelerometer – RAW Data – Translate and Object