

Unity – Local Data Base – SQLite – JavaScript
What is SQLite?
SQLite is a database system that requires no administration, it is a single file .db that can be written to a USB memory stick.
It is not directly comparable to client/server SQL database engines such as MySQL, Oracle, PostgreSQL, or SQL Server since SQLite is trying to solve a different problem.
SQLite Works Well:
– cellphones, set-top boxes, televisions, game consoles
– media cataloging and editing suites, CAD packages, record keeping programs
– low to medium traffic websites (a conservative estimate of fewer than 100K hits/day)
Creating and Exporting:
– the resulting database is a single file that can be written to a USB memory stick or emailed to a colleague.
A DB file looks like this: PlayersSQLite.db
– it provides access to that file via standard SQL commands.
– a lot af free reader for developers and end-users
I like SQlite Browser (http://sqlitebrowser.org/)
Controls and wizards are available for users to:
Create and compact database files
Create, define, modify and delete tables
Create, define and delete indexes
Browse, edit, add and delete records
Search records
Import and export records as text
Import and export tables from/to CSV files
Import and export databases from/to SQL dump files
Issue SQL queries and inspect the results
Examine a log of all SQL commands issued by the application
Available for Windows, MacOSX, Linux
Official website at: http://www.sqlite.org/whentouse.html
Another good software to create SQLite DB is SQLite Manager, a it is a plug-in for Firefox, free and crossplatform (https://addons.mozilla.org/ru/firefox/addon/sqlite-manager/)
SQLite Browser
1. Open SQLite Browser> File> New Database> create players.db
2. Table: players
3. Add fields:
– ID – INTEGER the ptimary key – check AI and PK (AUTOINCREMENT PRIMARY KEY)
– Name – TEXT to store var:String (Pietro)
– Scores – INTEGER to store var:int (124)
– Time – REAL to store var:float (20.7)
Move field up or down if necessary
or
CREATE TABLE `players` (
	`ID`	INTEGER PRIMARY KEY AUTOINCREMENT,
	`Name`	TEXT,
	`Score`	INTEGER,
	`Time`	REAL
);
4. click ‘OK’
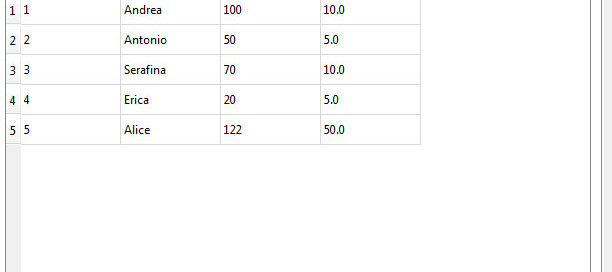
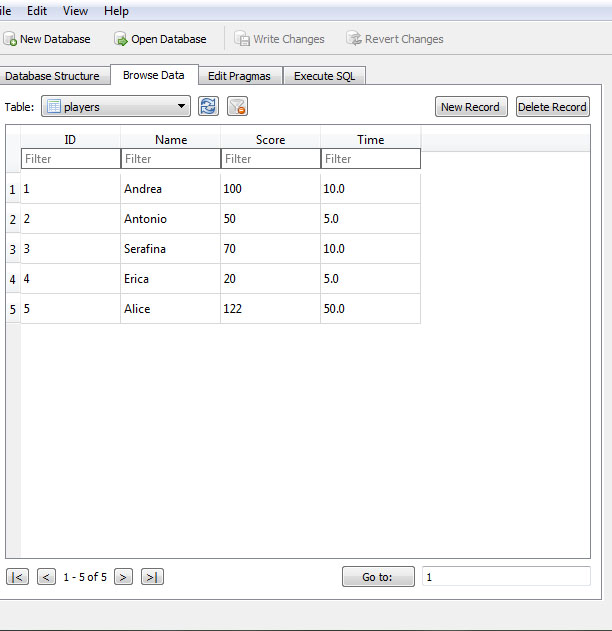
5. Populate the database:
Tab ‘Browse Data’
Table: Players
click ‘New Record’
the id field will auto increment
input Name – Score – Time
Andrea – 100 – 10
Antonio – 50 – 5
Serafina – 70 – 10
Erica – 20 – 5
Alice – 122 – 50
click ‘Write Changes’
SQLite and Unity
Unity 5.x comes with all SQLite Library included, you can see that in your:
C:/Programmi/Unity/Editor/Data/Mono/lib/mono/2.0/
“Mono.Data.dll”, “Mono.Data.Sqlite.dll” and “Mono.Data.SqliteClient.dll”
0. File> Build Settings…> PC MAC LINUX STAND ALONE
NOTICE: if you set WEB Player the console send you the error: Namespace ‘Mono.Data.Sqlite’ not found…
because of SQlite DOES NOT WORK with WEB PLAYER!
1. Download Precompiled Binaries for Windows 32> sqlite-dll-win32-x86-3081101.zip here:
https://www.sqlite.org/download.html
Inside the zip there are: sqlite3.dll and sqlite3.def
2. Download Precompiled Binaries for Windows 64> SQLite3-64.7z here:
http://blog.synopse.info/post/2013/03/23/Latest-version-of-sqlite3.dll-for-Windows-64-bit
There is sqlite3-64.dll, renaming to sqlite3.dll
Download library for Android> sqlite.so here:
https://github.com/ORuban/SQLite4Unity3d/tree/554b7ec0bea8fa17e5c5a11fd37b8f615dc549bc/Plugins/Android/libs/x86
2. Create
– Assets/Plugins/sqlite3.dll -> the sqlite3-64.dll renamed + sqlite3.def (Win MAC IOS)
– Assets/Plugins/Android/sqlite.so (Android)
– Unity/Scenes/MyScene.unity
– Unity/Scripts/dbAccess.js
– Unity Project Root/players.db (the database)
NOTICE: Project> Plugins> sqlite3.dll> Inspector, here you can setup the target platform, do not change anything, the recognization is automatic.
3. GameObject> Create Empty> name it GameController
DB Connection and Delete Table Contents
4. attach to GameController the script dbAccess.js:
#pragma strict

// IMPORT NAMESPACE CLASSES START ----------------------
// Mono non includone SQlite, devo importarlo a parte
// le classi le troviamo qui: C:/Programmi/Unity/Editor/Data/Mono/lib7mono/2.0/
import System.Data;  // we import our  data class
import Mono.Data.Sqlite; // we import sqlite
import System.Collections.Generic;
// IMPORT NAMESPACE CLASSES END ------------------------

// importo il namespace per verificare se un file esiste
import System.IO;

// variables for basic query access
var connection : String;
var dbcon : IDbConnection;
var dbcmd : IDbCommand;
var reader : IDataReader;

function Start () {
	OpenDB ();
}// END Start()

function Update () {
}// END Update()

// ####################################################################
// OPEN DB ############################################################
// ####################################################################
function OpenDB () {
	// Open Connection START ----------------------------

	// Windows MAC OS IOS +++++++++++++++++++++++++
	// è la posizione che assegnerà nella build finale
	// SE LO TROVA APRE LA CONNESSIONE
	// SE NON LO TROVA LO CREA IN AUTOMATICO NELLA ROOT DEL PROGETTO UNITY
	connection = "URI=file:players.db";
	// Android ++++++++++++++++++++++++++++++++++++
	// connection = "URI=file:" + p; // like this will NOT work on android
    // connection = "URI=file:" + Application.persistentDataPath + "/" + "players.db";  ---> PER ANDROID TOGLIERE QUESTO COMMENTO

    // DEBUG: check if connection exists START --------------------
    dbcon = new SqliteConnection(connection);
    if(dbcon != null) {
    	print ("MY COMMENT: connection to players.db OK");
    }
    else{
    	print ("MY COMMENT: connection to players.db FAIL");
    }
  	// DEBUG: check if connection exists END ----------------------

    dbcon.Open(); // open connection

	// Open Connection END --------------------------------

	// DEBUG: check if DB exists START --------------------
 	var fileName = "players.db";
    var path = Directory.GetCurrentDirectory() + "\\" + fileName;
    if (File.Exists(path))
    {
         print ("MY COMMENT: players.db file exists");
    }
    	else
    {
         print ("MY COMMENT: players.db file NOT exists");
    }
	// DEBUG: check if DB exists END ----------------------
}// END OpenDB

// ####################################################################
// DELETE TABLE #######################################################
// ####################################################################
// This function deletes all the data in the given table.  Forever.  WATCH OUT! Use sparingly, if at all
    function DeleteTableContents() {
    var query : String; // la definisco all'interno della funzione perchè resti limitata alla funzione corrente
    query = "DELETE FROM players" ;
    dbcmd = dbcon.CreateCommand();
    dbcmd.CommandText = query;
    reader = dbcmd.ExecuteReader();
    Debug.Log("You have just deleted players tab");
    }
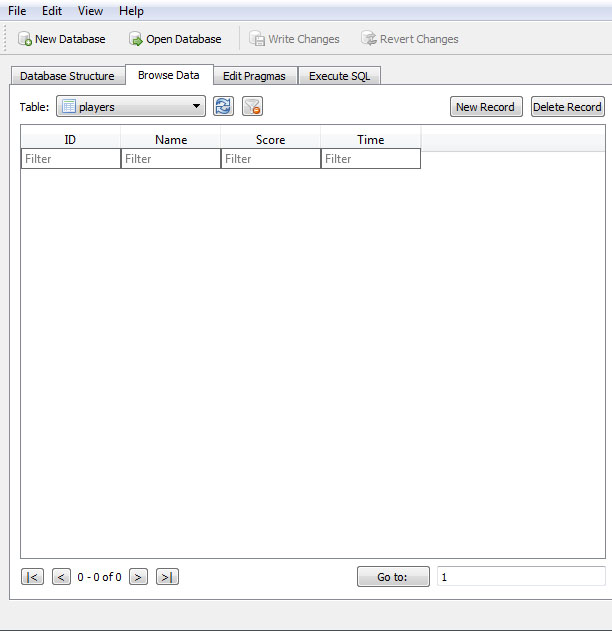
5. GameObject> UI> Button> name it Button-DeleteTableContents
Button-DeleteTableContents> Inspector> OnClick()> + > DRAG GameController and take function DeleteTableContents()
6. Play and press the button, try reload players.db with SQLite Browser, the table players will be empty.
We can analize the code:
1. import namespaces to integrate functions for ‘SQLite’ and ‘if file exist’
// IMPORT NAMESPACE CLASSES START ----------------------
// Mono non includone SQlite, devo importarlo a parte
// le classi le troviamo qui: C:/Programmi/Unity/Editor/Data/Mono/lib7mono/2.0/
import System.Data;  // we import our  data class
import Mono.Data.Sqlite; // we import sqlite
import System.Collections.Generic;
// IMPORT NAMESPACE CLASSES END ------------------------

// importo il namespace per verificare se un file esiste
import System.IO;
2. Set variables for basic query access
// variables for basic query access
var connection : String;
var dbcon : IDbConnection;
var dbcmd : IDbCommand;
var reader : IDataReader;
3. Open into Start() the DB connection
connection = "URI=file:players.db";
dbcon = new SqliteConnection(connection);
dbcon.Open(); // open connection
4. Delete Tab function using SQL syntax
function DeleteTableContents() {
    var query : String;
    query = "DELETE FROM players" ;
    dbcmd = dbcon.CreateCommand();
    dbcmd.CommandText = query;
    reader = dbcmd.ExecuteReader();
    Debug.Log("You have just deleted players tab");
    }
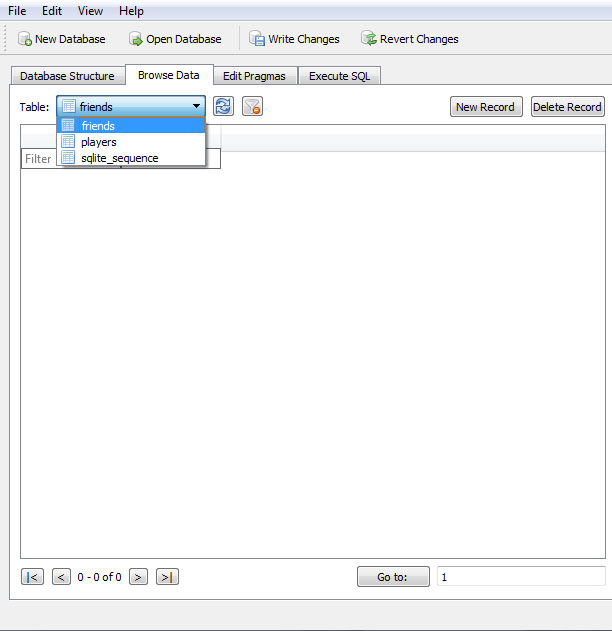
Create Table
// ####################################################################
// CREATE TABLE #######################################################
// ####################################################################
// This function create tables
function CreateTable() {
        // Create a table, name, column array, column type array
        var name : String = "friends";
        var col = ["Name", "Surname"];
        var colType = ["TEXT", "TEXT"];
        var query : String;
        query  = "CREATE TABLE " + name + "(" + col[0] + " " + colType[0];
        for(var i=1; i<col.length; i++) {
            query += ", " + col[i] + " " + colType[i];
        }
        query += ")";
        dbcmd = dbcon.CreateCommand(); // create empty command
        dbcmd.CommandText = query; // fill the command
        reader = dbcmd.ExecuteReader(); // execute command which returns a reader
        Debug.Log("You have just created friends tab");
    }// END CreateTable()
I can explain the code easily:
1. Set the name of the table, the name of the columns, the type of the columns
NOTICE: types can be NULL, INT, TEXT, REAL, BLOG
For more info about datatypes see: https://www.sqlite.org/datatype3.html
var name : String = "friends";
var col = ["Name", "Surname"];
var colType = ["TEXT", "TEXT"];
2. user ‘for’ to create all queries
NOTICE THE ROW: query += “)”;
for(var i=1; i<col.length; i++) {
            query += ", " + col[i] + " " + colType[i];
        }
query += ")";
Populate the DB
// #####################################################################
// INSERT INTO #########################################################
// #####################################################################
// This function insert values inside a table
function InsertInto() { // basic Insert with just values
// our data
var query : String;
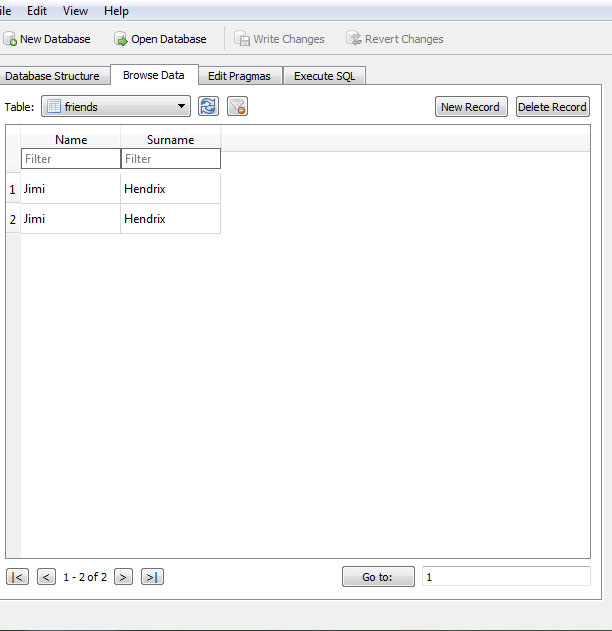
query = "INSERT INTO friends VALUES ('Jimi','Hendrix')";
// INSERT INTO TABLE_NAME VALUES ('Name','Surname');
dbcmd = dbcon.CreateCommand();
dbcmd.CommandText = query;
reader = dbcmd.ExecuteReader();
Debug.Log("You have just added Jimi Hendrix to friends tab");
}// END InsertInto()
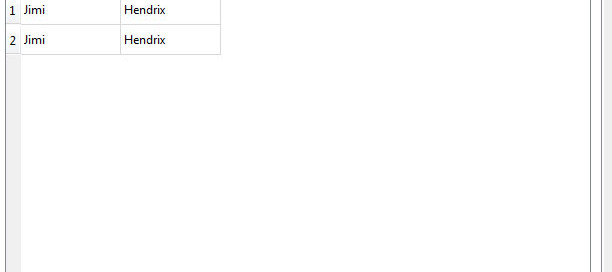
NOTICE THE APOSTROPHE: (‘Jimi’,’Hendrix’), NOT (Jimi,Hendrix)
If you insert the same data twice into the DB you will see:
Read DB content
Using the DB below:

...
// variables of ShowDatabase ()
var databaseData = new Array();
var textDbContent : UI.Text; // Assign in Inspector
function Start () {
...
// #########################################################################
// READ FULL TABLE #########################################################
// #########################################################################
// This returns a simple JS Array
function ReadFullTable(tableName : String) {
var query : String;
query = "SELECT * FROM " + tableName;
dbcmd = dbcon.CreateCommand();
dbcmd.CommandText = query;
reader = dbcmd.ExecuteReader();
var readArray = new Array();
while(reader.Read()) {
var lineArray = new Array();
for (var i:int = 0; i < reader.FieldCount; i++)
lineArray.Add(reader.GetValue(i)); // This reads the entries in a row
readArray.Add(lineArray); // This makes an array of all the rows
}
return readArray; // return matches
}// END ReadFullTable()
function ShowDatabase (){
databaseData = ReadFullTable("friends"); // invia i dati alla funzione per la lettura del DB
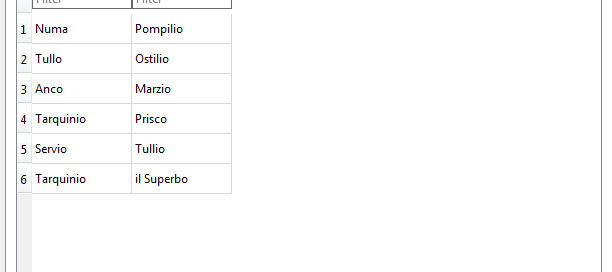
Debug.Log ("This is the array content index 0: " + databaseData[0]); // Numa Pompilio
Debug.Log ("This is the array content index 1: " + databaseData[1]); // Tullo Ostilio
Debug.Log ("This is the array content index 2: " + databaseData[2]); // Anco Marzio
Debug.Log ("This is the array content index 3: " + databaseData[3]); // Tarquinio Prisco
Debug.Log ("This is the array content index 4: " + databaseData[4]); // Servio Tullio
Debug.Log ("This is the array content index 5: " + databaseData[5]); // Tarquinio il Superbo
textDbContent.text = Array(databaseData).ToString(); // Numa,Pompilio,Tullo,Ostilio,Anco,Marzio etc...
}// END ShowDatabase ()
How does it work?
1. Create a UIText> Assign to dbAccess.jstextDbContent> var textDbContent
2. Create UI. Button> Inspector OnClic()> GameController> dbAccess.ShowDatabase
3. Play
4. OnClick() -> ShowDatabase () send the table name ‘friends’ to ReadFullTable(tableName : String)
5. ReadFullTable(tableName : String) return an array
6. ShowDatabase () read the array databaseData
Select DB content WHERE
...
// variables of ShowDatabase ()
var databaseData = new Array();
var textDbContent : UI.Text; // Assign in Inspector

function Start () {
...

// #########################################################################
// READ TABLE WHERE ########################################################
// #########################################################################
    // This returns a simple JS Array
    function ReadTableWhere(tableName : String) {
        var query : String;
        query = "SELECT Surname FROM " + tableName + " WHERE Name='Servio'";
        dbcmd = dbcon.CreateCommand();
        dbcmd.CommandText = query;
        reader = dbcmd.ExecuteReader();
        var readArray = new Array();
        while(reader.Read()) {
            var lineArray = new Array();
            for (var i:int = 0; i < reader.FieldCount; i++)
                lineArray.Add(reader.GetValue(i)); // This reads the entries in a row
            readArray.Add(lineArray); // This makes an array of all the rows
        }
        return readArray; // return matches
    }// END ReadFullTable()

	function ShowDatabaseWhere (){
		databaseData = ReadTableWhere("friends"); // invia i dati alla funzione per la lettura del DB
		Debug.Log ("This is the array content index 0: " + databaseData[0]); // Tullio
		textDbContent.text = Array(databaseData).ToString(); // Tullio
}// END ShowDatabase ()
NOTICE:
query = "SELECT Surname FROM " + tableName + " WHERE Name='Servio'";
// SELECT Surname FROM friends WHERE Name='Servio'
a common mistake is omit the spaces after FROM or before WHARE as:
query = "SELECT Surname FROM" + tableName + "WHERE Name='Servio'";
// SELECT Surname FROMfriendsWHERE Name='Servio' ---> BAAAAAADDDDDDD!!!!!!
Select DB content ORDER BY
...
// variables of ShowDatabase ()
var databaseData = new Array();
var textDbContent : UI.Text; // Assign in Inspector

function Start () {
...

// #########################################################################
// ORDER BY ################################################################
// #########################################################################
    // This returns a simple JS Array
    function ReadTableOrderBy(tableName : String) {
        var query : String;
        query = "SELECT Surname FROM " + tableName + " ORDER BY Name ASC";
        dbcmd = dbcon.CreateCommand();
        dbcmd.CommandText = query;
        reader = dbcmd.ExecuteReader();
        var readArray = new Array();
        while(reader.Read()) {
            var lineArray = new Array();
            for (var i:int = 0; i < reader.FieldCount; i++)
                lineArray.Add(reader.GetValue(i)); // This reads the entries in a row
            readArray.Add(lineArray); // This makes an array of all the rows
        }
        return readArray; // return matches
    }// END ReadFullTable()

	function ShowDatabaseOrderBy (){
		databaseData = ReadTableOrderBy("friends"); // invia i dati alla funzione per la lettura del DB
		Debug.Log ("This is the array content index 0: " + databaseData[0]); // Marzio     -> Anco
		Debug.Log ("This is the array content index 1: " + databaseData[1]); // Pompilio   -> Numa
		Debug.Log ("This is the array content index 2: " + databaseData[2]); // Tullio     -> Servio
		Debug.Log ("This is the array content index 3: " + databaseData[3]); // Prisco     -> Tarquinio -> id 4 in DB
		Debug.Log ("This is the array content index 4: " + databaseData[4]); // il superbo -> Tarquinio -> id 6 in DB
		Debug.Log ("This is the array content index 5: " + databaseData[5]); // Ostilio    -> Tullo

		textDbContent.text = Array(databaseData).ToString(); // Tarquinio,Servio,Tarquinio,Numa,Tullo,Anco
}// END ShowDatabase ()
NOTICE:
		databaseData[3]); // Prisco     -> Tarquinio -> id 4 in DB
		databaseData[4]); // il superbo -> Tarquinio -> id 6 in DB
Same Name but different id inside DB.
Close DB
...
// variables of ShowDatabase ()
var databaseData = new Array();
var textDbContent : UI.Text; // Assign in Inspector

function Start () {
...

// #########################################################################
// ORDER BY ################################################################
// #########################################################################
	// This returns a simple JS Array
    function ReadTableOrderBy(tableName : String) {
        var query : String;
        query = "SELECT Surname FROM " + tableName + " ORDER BY Name ASC";
        dbcmd = dbcon.CreateCommand();
        dbcmd.CommandText = query;
        reader = dbcmd.ExecuteReader();
        var readArray = new Array();
        while(reader.Read()) {
            var lineArray = new Array();
            for (var i:int = 0; i < reader.FieldCount; i++)
                lineArray.Add(reader.GetValue(i)); // This reads the entries in a row
            readArray.Add(lineArray); // This makes an array of all the rows
        }
        return readArray; // return matches
    }// END ReadFullTable()

	function ShowDatabaseOrderBy (){
		databaseData = ReadTableOrderBy("friends"); // invia i dati alla funzione per la lettura del DB
		Debug.Log ("This is the array content index 0: " + databaseData[0]); // Marzio     -> Anco
		Debug.Log ("This is the array content index 1: " + databaseData[1]); // Pompilio   -> Numa
		Debug.Log ("This is the array content index 2: " + databaseData[2]); // Tullio     -> Servio
		Debug.Log ("This is the array content index 3: " + databaseData[3]); // Prisco     -> Tarquinio -> id 4 in DB
		Debug.Log ("This is the array content index 4: " + databaseData[4]); // il superbo -> Tarquinio -> id 6 in DB
		Debug.Log ("This is the array content index 5: " + databaseData[5]); // Ostilio    -> Tullo

		textDbContent.text = Array(databaseData).ToString(); // Tarquinio,Servio,Tarquinio,Numa,Tullo,Anco
		CloseDB();
}// END ShowDatabase ()

// #########################################################################
// CLOSE DB ################################################################
// #########################################################################
function CloseDB() {
        reader.Close(); // clean everything up
        reader = null;
        dbcmd.Dispose();
        dbcmd = null;
        dbcon.Close();
        dbcon = null;
        Debug.Log("DB Closed");
    }// END CloseDB()
References:
http://forum.unity3d.com/threads/unity-3d-android-sqlite-examples.114660/ -> very easy to understand C#
http://wiki.unity3d.com/index.php/SQLite -> complete JS classes
http://sysmagazine.com/posts/181239/
http://answers.unity3d.com/questions/188334/unity-sql-database.html