Unreal Engine – Class Blueprint

Unreal Engine – Class Blueprint

A Class Blueprint is a Blueprint that can be reused many times in your world.
If you will have more than one or two instances (e.g., a TV set that can be shot or turned on/off), then it probably makes sense to create a Class Blueprint. Inside a Class Blueprint you can store Meshes, Lights and connects their behaviours with visual Scripts.

Create a Class Blueprint

1. Content Browser> click un ‘New’> Blueprint> Choose a Parent Class example: Actor

When your Blueprint is first created, or when you make changes to it in the Blueprint Editor, an asterisk will be added to the Blueprint’s icon in the Content Browser. This indicates that the Blueprint is not saved.

2. Content Browser> ‘Save’ button -> TO SAVE YOUR ASSET

3. Editor> MAIN TOP MENU> File> Save, to save the corrent level -> TO SAVE YOUR LEVEL (level.umap)

OR

1. MAIN TOP TOOL BAR> Blueprints> New Class Blueprint> Choose a Parent Class example: Actor> Give it a name and a folder (usually Blueprints/yourBlueprint)

When your Blueprint is first created, or when you make changes to it in the Blueprint Editor, an asterisk will be added to the Blueprint’s icon in the Content Browser. This indicates that the Blueprint is not saved.

2. Blueprint window> ‘Save’ -> TO SAVE YOUR ASSET

3. Editor> MAIN TOP MENU> File> Save, to save the corrent level -> TO SAVE YOUR LEVEL (level.umap)

Search a Class Blueprint

The best way it is put all your Blueprints inside a Blueprints folder (Content Browser/Game/Blueprints).
To find a Blueprint inside another location go to Content Browser> Game (the top folder)> ON THE RIGHT: Filters and/or Search

Edit a Class Blueprint

1. Content Browser> double click over yourBlueprint, the Class Blueprint Editor will appear.

Defaults mode
Setup of default parameters:
– Rendering
– Replication
– Input
– Actor
– Tags

Components mode
Use the roolout menu ‘Add Components’ to add components as:
– Audio
– Skeletal Mesh
– Static Mesh

– Paper Flipbook
– Paper Sprite
– Paper Tile Map Render

etc…

OR

DRAG AND DROP assets from Content Browser to Components List

Navigate inside the View using Autodesk Maya-style controls:
– LMB to move foward/backward
– ALT + LMB to move up/dowm/left/right
– PRESS MOUSE WHELL to move up/down
– ROTATE MOUSE WHELL to dolly in/out

– RMB to look around
– RMB + WASD to move

– F to frame an object
– Select a Component + ALT + LMB to tumble around selected object
– Select a Component + ALT + RMB to dolly in/out selected object

Component List> RMB> Cut, Copy, Paste, Duplicate, Rename, Add Event (OnComponentHit, OnComponentBeginOverlap etc…)
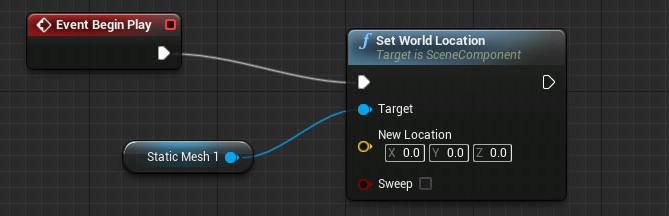
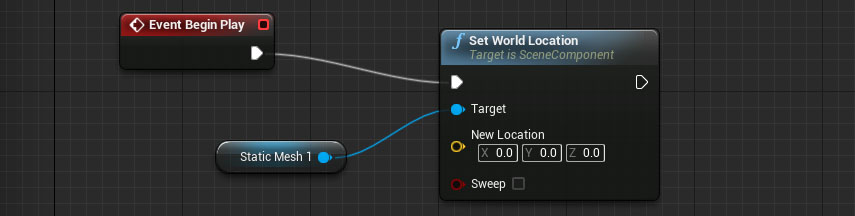
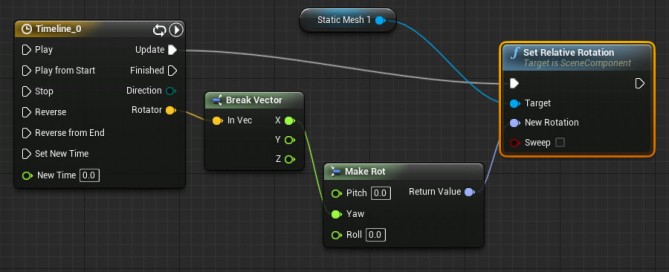
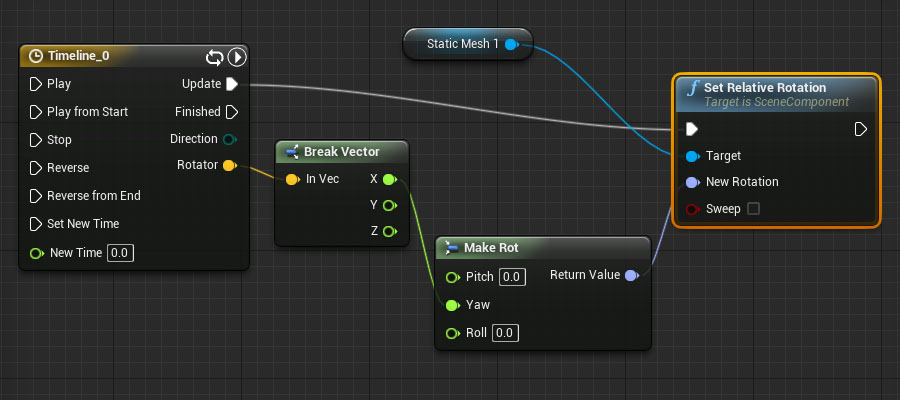
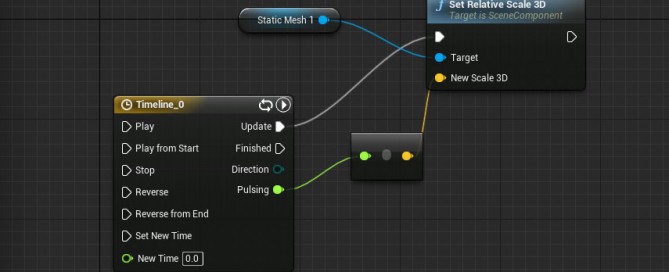
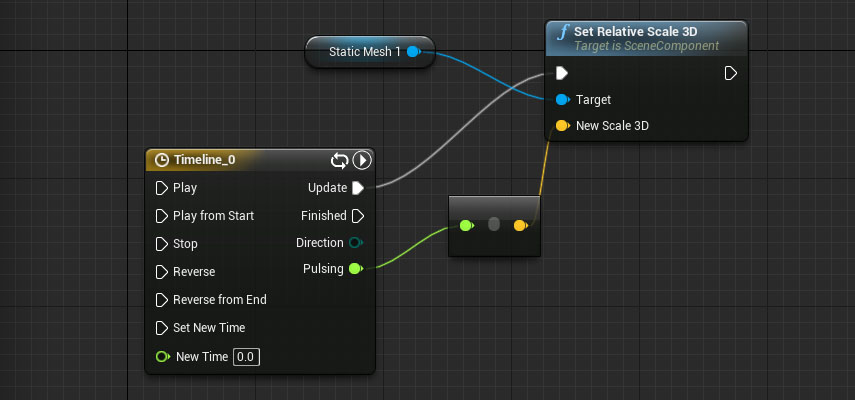
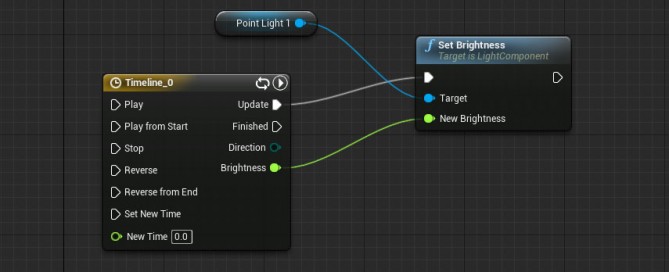
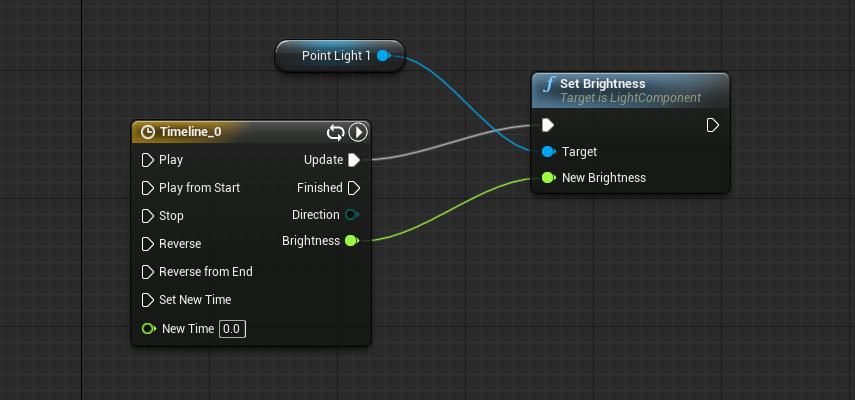
Graph mode
Here we create all nodes and connects between blocks.

Navigate the window with:
– RMB to drag the view
– ROTATE MOUSE WHELL to zoom in/out
– LMB single click to select single block
– LMB single click + SHIFT to add block to selection
– LMB + DRAG to select multiple blocks

Put your Blueprint assets in scene

Content Browser> DRAG AND DROP items into Editor Viewport

NOTICE: you are not be able to adjust Components of Blueprint inside Editor Viewport, but only inside Class Blueprint Editor

Compile a Class Blueprint

1. Change something in your Blueprint

2. Class Blueprint Editor> TOP LEFT> ‘Compile’ button -> the Editor Window will be updated.

By |Unreal Engine, Video Games Development|Commenti disabilitati su Unreal Engine – Class Blueprint

Unreal Game Engine – Blueprints – Set World Location

Unreal Game Engine – Blueprints – Set World Location

1. LEFT COLUMN> Content Browser> RMB over a Mesh (example Floor_400x400)> Create Blueprint Using…> select your ‘Blueprints’ folder> give it the name (example Floor_400x400_Blueprint)

2. Blueprint window> TOP RIGHT> Components> WHELL MOUSE BUTTON to zoom in/out

3. Blueprint window> TOP RIGHT> Graph> you can see component on the RIGHT COLUMN: – StaticMesh1

4. Event Graph> RIGHT COLUMN> DRAG AND DROP StaticMesh1 over an empty area> Get (to add StaticMesh1 block)

5. Event Graph> DRAG from StaticMesh1 to an empty area> Set Wold Location (to add Set World Location block)

6. Event Graph> RMB over an Empty Area> Event Begin Play (to add Event Begin Play block)

7. Event Graph> Create other connections as in the image below

8. Unreal Editor> Content Browser> Blueprint folder> ‘Floor_400x400_Blueprint’ DRAG AND DROP into scene

9. Play

unreal-blueprints-worldposition-mesh

For italian people: come funziona?

1. All’inizio del gioco (Event Begin Play block) —> viene settata la posizione assoluta (Set World Location) —> per Static Mesh 1

By |Unreal Engine, Video Games Development|Commenti disabilitati su Unreal Game Engine – Blueprints – Set World Location

Unreal Game Engine – Blueprints – Mesh Rotator

Unreal Game Engine – Blueprints – Mesh Rotator

1. LEFT COLUMN> Content Browser> RMB over a Mesh (example Floor_400x400)> Create Blueprint Using…> select your ‘Blueprints’ folder> give it the name (example Floor_400x400_Blueprint)

2. Blueprint window> TOP RIGHT> Components> WHELL MOUSE BUTTON to zoom in/out

3. Blueprint window> TOP RIGHT> Graph> you can see component on the RIGHT COLUMN: – StaticMesh1

4. Blueprint window> TOP RIGHT> Graph> RMB over an Empty Area> Add Timeline

5. DOUBLE CLICK Timeline box> Timeline window> Add Vector Track

6. Vector Track> TOP LEFT> name the track ‘Rotator’

7. Vector Track> TOP> Length> 1 second

8. Vector Track> RMB over empty area> Add Key: 0 sec->1 / 1 sec->360

9. Float Track> TOP> check Autoplay and Loop

10. Event Graph> RIGHT COLUMN> DRAG AND DROP StaticMesh1 over an empty area> Get (to add StaticMesh1 block)

11. Event Graph> DRAG from StaticMesh1 to an empty area> Set Relative Rotation (to add Relative Rotation block)

12. Event Graph> DRAG from Timeline>Update to Set Relative Rotation>exec

13. Event Graph> DRAG from Timeline>Rotator to an empty area (to add Break Vector)

14. Event Graph> DRAG from Set Relative Rotation>New Rotation to an empty area (to add Make Rot block)

15. Event Graph> Create other connections as in the image below

16. Unreal Editor> Content Browser> Blueprint folder> ‘Floor_400x400_Blueprint’ DRAG AND DROP into scene

17. Play

unreal-blueprints-mesh-rotator

For italian people: come funziona?

1. Timeline invia i valori di Rotator ad ogni fotogramma alla funzione Set Relative Rotation
2. Set Relative Rotation invia i dati di rotazione a Static Mesh 1

NOTA BENE: la traccia Rotator deve essere prima separata con Break Vector, poi assegnata con Make Rot a New Rotation

By |Unreal Engine, Video Games Development|Commenti disabilitati su Unreal Game Engine – Blueprints – Mesh Rotator

Unreal Game Engine – Blueprints – Pulsing Mesh

Unreal Game Engine – Blueprints – Pulsing Mesh

1. LEFT COLUMN> Content Browser> RMB over a Mesh (example Floor_400x400)> Create Blueprint Using…> select your ‘Blueprints’ folder> give it the name (example Floor_400x400_Blueprint)

2. Blueprint window> TOP RIGHT> Components> WHELL MOUSE BUTTON to zoom in/out

4. Blueprint window> TOP RIGHT> Graph> you can see component on the RIGHT COLUMN: – StaticMesh1

5. Blueprint window> TOP RIGHT> Graph> RMB over an Empty Area> Add Timeline

6. DOUBLE CLICK Timeline box> Timeline window> Add Float Track

7. Float Track> TOP LEFT> name the track ‘Pulsing’

8. Float Track> TOP> Length> 1 second

9. Float Track> RMB over empty area> Add Key: 0 sec->1 / 0.5 sec->0.5 / 1->1

10. Float Track> TOP> check Autoplay and Loop

11. Event Graph> RIGHT COLUMN> DRAG AND DROP StaticMesh1 over an empty area> Get (to add StaticMesh1 block)

12. Event Graph> DRAG from StaticMesh1 to an empty area> Set Relative Scale 3D (to add Relative Scale 3D block)

13. Event Graph> DRAG from Timeline>Update to Set Relative Scale 3D>exec

14. Event Graph> DRAG from Timeline>Pulsing to Set Relative Scale 3D>New Scale

14. Unreal Editor> Content Browser> Blueprint folder> ‘Floor_400x400_Blueprint’ DRAG AND DROP into scene

15. Play

unreal-blueprints-pulsing-mesh

For italian people: come funziona?

1. Timeline>Update —> Set Relative Scale 3D: esegue un update continuo di Set Relative Scale 3D ad ogni fotogramma

2. Timeline>Pulsing —> New Scale: fornisce il valore variabile nel tempo

3. Set Relative Scale 3D>Target —> Static Mesh 1: setta la scala di Static Mesh 1

By |Unreal Engine, Video Games Development|Commenti disabilitati su Unreal Game Engine – Blueprints – Pulsing Mesh

Unreal Game Engine – Blueprints – Flashing Light

Unreal Game Engine – Blueprints – Flashing Light

1. LEFT COLUMN> Content Browser> RMB over a Mesh (example Floor_400x400)> Create Blueprint Using…> select your ‘Blueprints’ folder> give it the name (example Floor_400x400_Blueprint)

2. Blueprint window> TOP RIGHT> Components> WHELL MOUSE BUTTON to zoom in/out

3. Blueprint window> MAIN TOP MENU> Window> Components> Add Component> Point Light> move the Point Light over the Mesh

4. Blueprint window> TOP RIGHT> Graph> you can see component on the RIGHT COLUMN: – PointLight1 – StaticMesh1

5. Blueprint window> TOP RIGHT> Graph> RMB over an Empty Area> Add Timeline

6. DOUBLE CLICK Timeline box> Timeline window> Add Float Track

7. Float Track> TOP LEFT> name the track ‘Brightness’

8. Float Track> TOP> Length> 1 second

9. Float Track> RMB over empty area> Add Key: 0 sec->0 / 0.5 sec->5.000 / 1->0

10. Float Track> TOP> check Autoplay and Loop

11. Event Graph> RIGHT COLUMN> DRAG AND DROP PointLight1 over an empty area> Get (to add Point Light block)

12. Event Graph> DRAG from Point Light to an empty area> Set Brightness (to add Set Brightness block)

13. Event Graph> DRAG from Timeline>Update to set Brightness>exec

14. Unreal Editor> Content Browser> Blueprint folder> ‘Floor_400x400_Blueprint’ DRAG AND DROP into scene

15. Play

unreal-blueprints-flashing-light

For italian people: come funziona?

1. Timeline>Update —> Set Brighness: esegue un update continuo di Set Brightness ad ogni fotogramma

2. Timeline>Brightness —> New Brighness: fornisce il valore variabile nel tempo Brightness

3. SetBrightness>Target —> Point Light 1: setta la luminosità di Point Light 1

By |Unreal Engine, Video Games Development|Commenti disabilitati su Unreal Game Engine – Blueprints – Flashing Light