Unreal Game Engine – Blueprints – Pulsing Mesh
1. LEFT COLUMN> Content Browser> RMB over a Mesh (example Floor_400x400)> Create Blueprint Using…> select your ‘Blueprints’ folder> give it the name (example Floor_400x400_Blueprint)
2. Blueprint window> TOP RIGHT> Components> WHELL MOUSE BUTTON to zoom in/out
4. Blueprint window> TOP RIGHT> Graph> you can see component on the RIGHT COLUMN: – StaticMesh1
5. Blueprint window> TOP RIGHT> Graph> RMB over an Empty Area> Add Timeline
6. DOUBLE CLICK Timeline box> Timeline window> Add Float Track
7. Float Track> TOP LEFT> name the track ‘Pulsing’
8. Float Track> TOP> Length> 1 second
9. Float Track> RMB over empty area> Add Key: 0 sec->1 / 0.5 sec->0.5 / 1->1
10. Float Track> TOP> check Autoplay and Loop
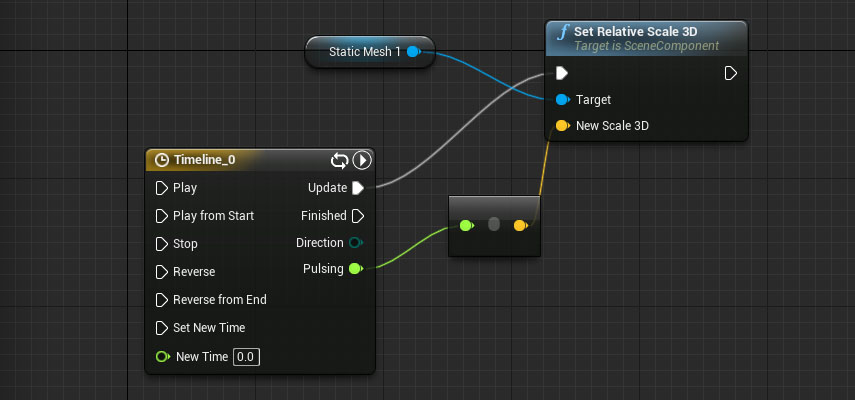
11. Event Graph> RIGHT COLUMN> DRAG AND DROP StaticMesh1 over an empty area> Get (to add StaticMesh1 block)
12. Event Graph> DRAG from StaticMesh1 to an empty area> Set Relative Scale 3D (to add Relative Scale 3D block)
13. Event Graph> DRAG from Timeline>Update to Set Relative Scale 3D>exec
14. Event Graph> DRAG from Timeline>Pulsing to Set Relative Scale 3D>New Scale
14. Unreal Editor> Content Browser> Blueprint folder> ‘Floor_400x400_Blueprint’ DRAG AND DROP into scene
15. Play
For italian people: come funziona?
1. Timeline>Update —> Set Relative Scale 3D: esegue un update continuo di Set Relative Scale 3D ad ogni fotogramma
2. Timeline>Pulsing —> New Scale: fornisce il valore variabile nel tempo
3. Set Relative Scale 3D>Target —> Static Mesh 1: setta la scala di Static Mesh 1