Unreal Game Engine – BluePrints – Variables and Datatypes

Unreal Game Engine – BluePrints – Variables and Datatypes

1. LEFT COLUMN> Content Browser> New> Blueprint> Actor> name it ‘MyBlueprint’, double click to open it.

2. MyBlueprint window> LEFT COLUMN> +Variable, nami it ‘MyFirstVar’

3. MyBlueprint window> LEFT COLUMN> Details> Variable Type> select the type between:

– bool : boolean
– byte
– int : integer numbers
– float : floating point numbers
– name
– string : alphanumeric characters
– text
– Vector : XYZ
– Rotator : rotation information
– Transform: translation, rotation, scale

+————-| on the right click over the red ‘Array’ icon to create an array.

4. DRAG AND DROP ‘MyFirstVar’ into EventGraph> Get> now the Variable Type is permanent and it can’t be changed.

By |Unreal Engine, Video Games Development|Commenti disabilitati su Unreal Game Engine – BluePrints – Variables and Datatypes

Unreal Game Engine – Blueprints – Toggle Light – OnActorBeginOverlap

Unreal Game Engine – Blueprints – OnActorBeginOverlap – Toggle Light

1. LEFT COLUMN> Modes> Light DRAG AND DROP a Point Light in the scene

2. LEFT COLUMN> Modes> Basic> DRAG AND DROP a Box Trigger in the scene

3. RIGHT COLUMN> Actor: TriggerBox> Blueprint> Add Level Events for TriggerBox> Add OnActorBeginOverlap> Blueprint Window appears

4a. 3D Viewport> select the Point Light
4b. Blueprint Window> RMB in a empty area> Call Function On Point light> Rendering> Toggle Visibility

5 Blueprint Window> connect OnActorBeginOverlap output—>input Toggle Visibility

6. MAIN TOP TOOLBAR> Play this level (the joypad icon), move the player over the Box Trigger to turn light on/off

unreal-blueprints-toggle light-OnActorBeginOverlap

By |Unreal Engine, Video Games Development|Commenti disabilitati su Unreal Game Engine – Blueprints – Toggle Light – OnActorBeginOverlap

Unreal Game Engine – Blueprints – Overview

Unreal Game Engine – Blueprints – Overview

Blueprints are the Visual Programming System of Unreal Game Engine.
They allow non-programmers to create features by themselves.
To create behaviours you will need only create relatioship between blocks of a flow chart!

How to create a simple Blueprint?
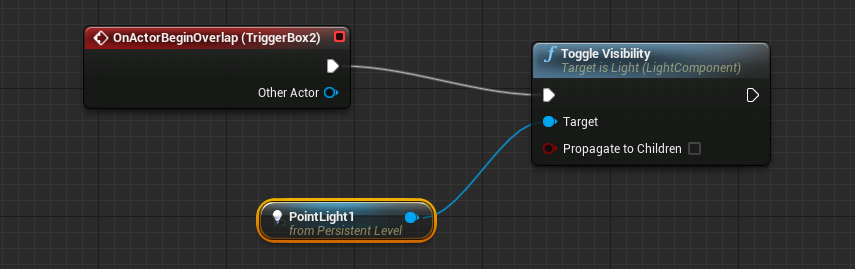
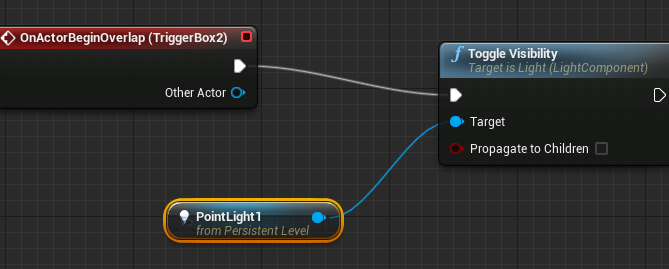
It is really easy and funny, in the next sample we toggle a light using Blueprints.

Object -> Create Blueprint

1. LEFT COLUMN> Modes> Light DRAG AND DROP a Point Light in the scene

2. LEFT COLUMN> Modes> Basic> DRAG AND DROP a Box Trigger in the scene

3. RIGHT COLUMN> Actor: TriggerBox> Blueprint> Add Level Events for TriggerBox> Add OnActorBeginOverlap> Blueprint Window appears

4a. 3D Viewport> select the Point Light
4b. Blueprint Window> RMB in a empty area> Call Function On Point light> Rendering> Toggle Visibility

5 Blueprint Window> connect OnActorBeginOverlap output—>input Toggle Visibility

6. MAIN TOP TOOLBAR> Play this level (the joypad icon), move the player over the Box Trigger to turn light on/off

unreal-blueprints-overview

Blueprint -> Attach Component

1. LEFT COLUMN> Content Browser> select Blueprints folder> New> ‘Actor’
2. name it MyBlueprint, DOUBLE click on it
3. Blueprint window> TOP RIGHT> Components
4. Blueprint window> LEFT COLUMN> Components> Add Component> Rendering> Billboard
5. Blueprint window> TOP RIGHT> Graph
6. LEFT COLUMN> MyBlueprint> +variable> name it MyVar
7. LEFT COLUMN> Details> Variable Name ‘MyVar’, Variable Type> bool
8. LEFT COLUMN> MyBlueprint> DRAG AND DROP MyVar into Event Graph> Get -> after that you can’t change the Variable Type

… and so on to create your Blueprint …

By |Unreal Engine, Video Games Development|Commenti disabilitati su Unreal Game Engine – Blueprints – Overview

Unreal Game Engine – Create New Project an New Levels

Unreal Game Engine – Create New Project an New Levels

Create

1. File> New Project
2. New Project Window> Blank
3. Check ‘Include starter content’
4. Name: yournameProject
5. on the right click over the button to expand window and choose a Folder
6. click ‘Create Project’ button

Setup

The project will be opened, after that:

1. MAIN TOP MENU> Edit> Editor Preferences>
– General Appearance> User Interface> check ‘Use Small Tool Bar Icons’
– Loading & Saving > uncheck Autosave

2. MAIN TOP MENU> Edit> Project Settings>
– Game> Supported Platforms
– Engine> Input
– Platforms> iOS / Windows

Viewports

Setup Viewport

1. Window> Viewports> Viewport2
2. DRAG AND DROP the viewport label under TOP Toolbar to create a new stable window in the workarea

Levels

A videogame project can be divided in different levels: Level1, Level2, Level3 etc…

To create new levels: MAIN TOP MENU> File> New Level
To save levels: MAIN TOP MENU> File> Save or Save As… -> Unreal will create the file ‘Level1.umap’ (Unreal Map)

By |Unreal Engine, Video Games Development|Commenti disabilitati su Unreal Game Engine – Create New Project an New Levels

Unreal Engine – Editor Overview

Unreal Engine – Editor Overview

Place New Objects

Window> Modes> Place> Geometry> DRAG AND DROP the game object thumb over the 3D Viewport

OR

Window> Content Browser> DRAG AND DROP the game object thumb over the 3D Viewport

Move/Scale/Rotate/Setup Objects

LMB select the object and use the top right small icons to select transformations tools, after that use the handles on screen

OR

1. Window> Scene Outliner> click over the object list to select
2. Window> Details> setup

Static Mesh Editor

RMB over a mesh> (home icon)Edityourmesh

Parenting objects

RIGHT COLUMN> Scene Outliner> DRAG AND DROP an object over another object, the dragged object will be the child of the second one.

Material Editor

RIGHT COLUMN> Details> Materials> DOUBLE CLICK over material preview

Move Camera View

LMB: rotate camera right left and move forward / backward

MMB: move left / right / up / down

Mouse Whell: zoom in / out

RMB: look at right / left / up / down

RMB + WASD: look and move like a FPS

ALT + LMB: orbit around the selected object

By |Unreal Engine, Video Games Development|Commenti disabilitati su Unreal Engine – Editor Overview