3D-Coat – UV Mapping
3D Coat is an interesting 3D software, easy to use and very good to improve our productivity.
It can be used near 3DSMax, Maya or others big brands to speed up the workflow.
In this article I will explain how use 3D Coat to UV Unwrapping operations.
UV Map Unwrapping cause me a lot of pain because the classic UVWUnwrap modifier of 3DSMax is very boring and not so easy to use.
Even if you are a UVWUnwrap modifier-genie you will spend a lot of time to create a good work. If you work in the game industry, the pain will be increased by texture optimization needed, them… let’s go on to discover 3D Coat UV Tools 
3DS Max – Exporting
1. Create a 3D model – Editable Poly inside 3DS Max
2. Select the model> RIGHT COLUMN> Modify> Modifier List> UVW Mapping Clear> RMB> Collapse All
3. Select the model> RIGHT COLUMN> Utilities> Reset XForm> Reset Selected
In this way we will clear all old UV Maps and transformations
4. MAX> Export> Export Selected> .fbx
3D Coat – Importing
1. Run 3D Coat, into Wizard window select ‘UV Map Mesh’
2. In the Import Object window select:
– Normal Map Software Preset: Unknown
– Initial Subdivision: No Subdivision
– UV Map Typing: Keep UV
– UV Sey Smooting: No Smoothing
Texture Width: 1024
Texture Height: 1024
press ‘OK’ button.
3. File> Save As, then save your project
3D Coat – Auto Seams
1. LEFT COLUMN> Commands> Auto Seams
3D Coat will create all required seams automatically, calculating distortion, shape etc…
2. LEFT COLUMN> Commands> Unwrap
Fit all clusters onto the texture
3. LEFT COLUMN> Commands> Auto Scale
Auto scale all island to have equal propotions between square in space and square in UV set
The final result here:
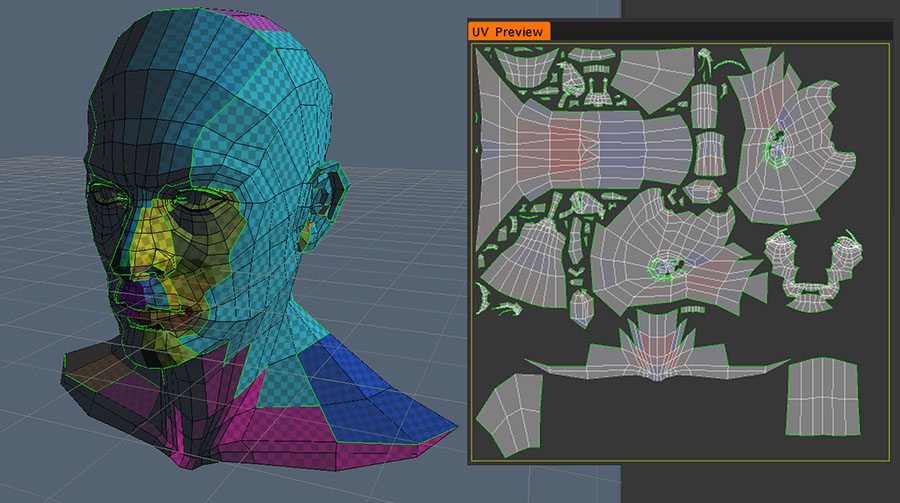
Notice that in the 3d mesh the size of the squares are the same for all islands.
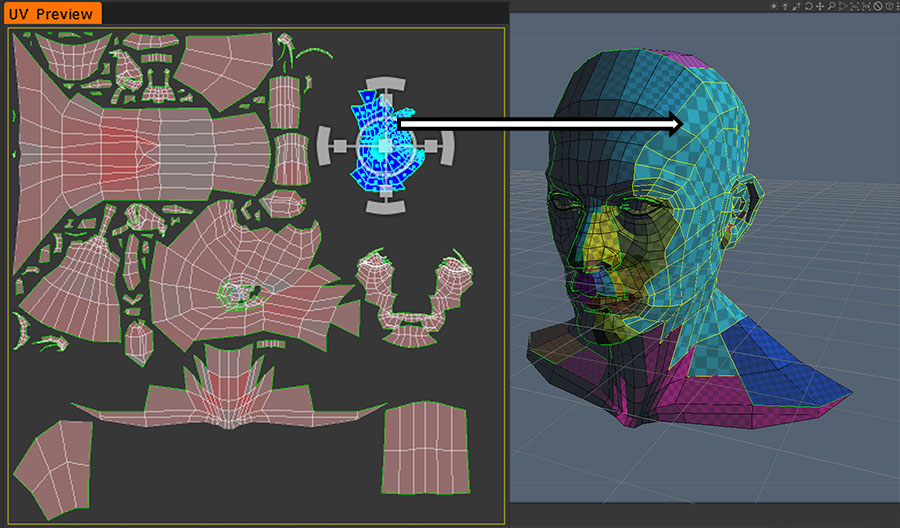
4. In the ‘UV Preview’ click over an island and resize it down, see the result below, the squares of this island will be bigger.
3D Coat – Export
1. LEFT COLUMN> Commands> Apply UV-set
2. File> Export Model> .fbx
3. ‘OK’
3DS Max – Importing
1. MAx> Import> .fb
2. Select the object> RIGHT COLUMN> Modify> Modifier List> Unwrap UVW
3. Select Unwrap UVW modifier> Edit UVs> Open UV Editor…, then you will see the work you have done using 3D Coat
3D Coat – Mark Seams Manually
To create a good texture map for a game character you need an island for the head and separated islands for the rest of the body.
‘Auto Seam’ command is good, but if you have an organic model, 3D Coat can’t understand where is the head, the hands, the torso etc… without your help! Let’s try to help it!
1. Import your 3D Mesh
2. LEFT COLUMN> Modes> Edge Loops
3. Over the 3D Mesh> LMB and select edges OR CTRL+LMB to deselect
AND/OR
2. LEFT COLUMN> Modes> Mark Seams
3. Over the 3D Mesh>LMB select edges OR CTRL+LMB to deselect
4. LEFT COLUMN> Commands> Unwrap
5. LEFT COLUMN> Commands> Auto Scale
An example of marking manual seams, it is not a good work, it is only an example.

Compare colors of 3d mesh in ‘3D View’ and islands in ‘UV Preview’ to better understand.
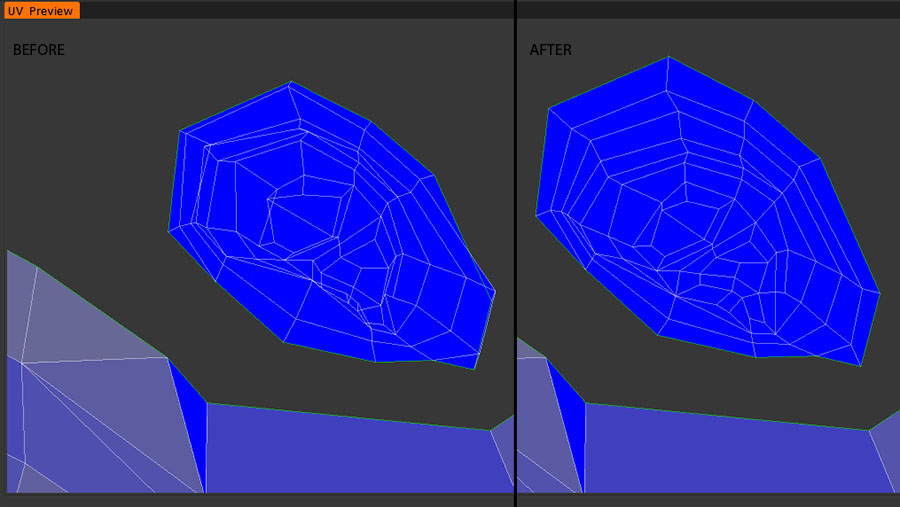
Relax
You will relax UV if you need to redure square trash. Relax UV introduces additional stretching.
You should choose what is better for you: square trash or strech.
1. MAIN TOP MENU> ‘Islands’ to enable the islands selection
2. UV Preview> MMB to move the view AND RMB to scale the view
3. UV Preview> select an island and scale if you need
4. RIGHT COLUMN> Selected> Relax
See the image below: before and after ‘Relax’ command
Manipulate UV Vertices
1. MAIN TOP MENU> Vertices
2. UV Preview> MMB to move the view AND RMB to scale the view
3. UV Preview> select an island scale if you need
4. UV Preview> LMB+single click select one vertice OR LMB+maintain pressure+slide over vertices for multiple selection
5. Manipulate using the handles
6. LEFT COLUMN> Selected> Clear to end the selection
Planar Mapping
1. MAIN TOP MENU> Island
2. UV Preview> MMB to move the view AND RMB to scale the view
3. UV Preview> select an island and scale if you need
4. RIGHT COLUMN> Selected> To Planar
Other Algorithms for Mapping
1. MAIN TOP MENU> Island
2. UV Preview> MMB to move the view AND RMB to scale the view
3. UV Preview> select an island and scale if you need
4. RIGHT COLUMN> Selected>
> To GU: 3D-Coat’s proprietary unwrapping algorithm, Globally Uniform. Great for all types of meshes, be they organic or hard surface. Try it Love it!
> To LSCM: LSMC algorithm
> To ABF: ABF++ algorithm
Hide Islands
1. MAIN TOP MENU> Island
2. UV Preview> select an island
3. RIGHT COLUMN> Selected> Hide / Unhide
Clear All
1. LEFT COLUMN> Commands> Clear Seams, clear all seams
2. LEFT COLUMN> Commands> Upd. Islands, to refresh the UV Preview
3. LEFT COLUMN> Commands> Restore UV, restore original UV


