This is a practical guide about use websockets with node.js in locahost.
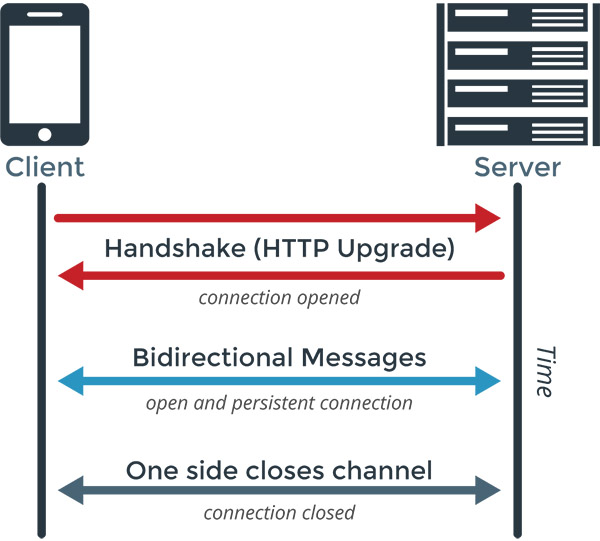
WebSocket is a computer communications protocol, providing full-duplex communication channels over a single TCP connection. (https://en.wikipedia.org/wiki/WebSocket)
A WebSocket is a persistent connection between a client and server and is perfect for chat, social applications, games, in general realtime communication applications.
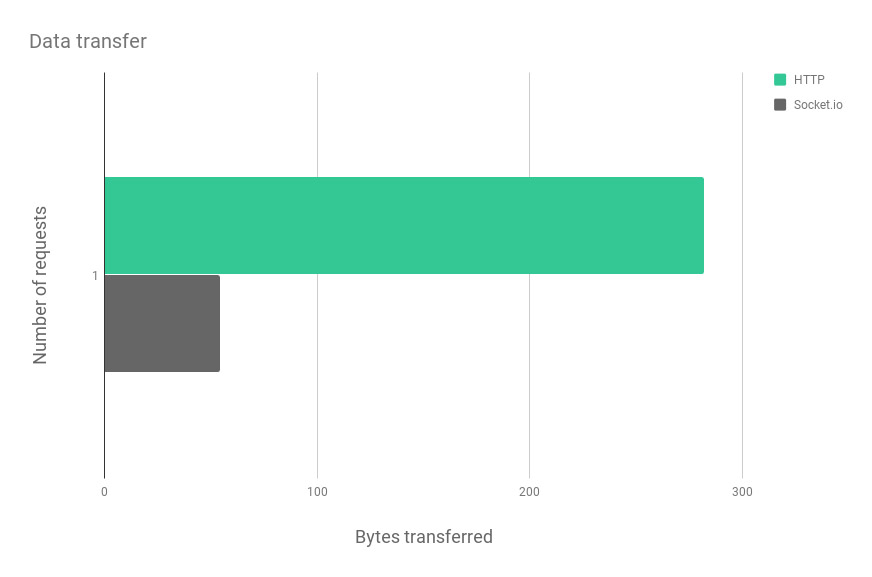
Data transfer is cery efficient, one HTTP request and response took a total of 282 bytes while the request and response websocket frames weighed in at a total of 54 bytes (31 bytes for the request message and 24 bytes for the response).
Ok, i’ll stop annoing you, let’s start coding 😀
Start your localhost environement, mine is Laragon
1. Create a new folder for this app laragon/www/websockets
2. Open the Laragon’s Cmder in laragon/www/websockets and type: node -v
If it is running you have node.js working in your system
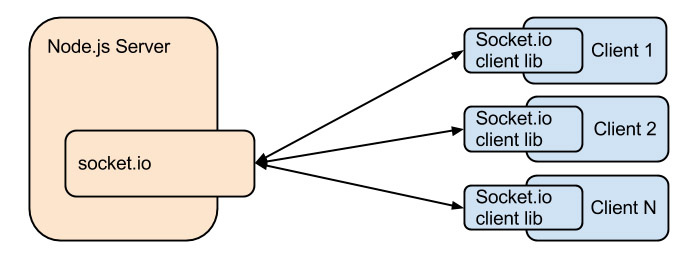
3. Type: npm install socket.io
Install the module to manage Websocket
4. Create laragon/www/websockets/app.js
This is the main js file of you app
var http = require('http');
var fs = require('fs');

// a. Load index.html
var server = http.createServer(function(req, res) {
  fs.readFile('./index.html', 'utf-8', function(error, content) {
    res.writeHead(200, {"Content-Type": "text/html"});
    res.end(content);
  });
});

// b. Load Socket.io, socket.io listen to server = http.createServer...
var io = require('socket.io').listen(server);

// c. When a client connect write a message in console
io.sockets.on('connection', function (socket) {
  console.log('New user connected');
  socket.emit('message', 'You are connected!');

// In case of an event "message" from client
  socket.on('message', function (message) {
      console.log('The client say:' + message);
  });
});

server.listen(8080);
The actions in order are:
a. create a classic http connection to load index.html
b. open, using Websocket a tunnel between client and server, this will be now a stable full duplex connection
c. check in console the success of the handshake and send a message to client
5. Create laragon/www/websockets/index.html
This is the client side rendered by the browser
<script src="/socket.io/socket.io.js"></script>
  <script>
  var socket = io.connect('http://localhost:8080');
  </script>
It is important put this JS near
to not interfere with the loadind of the page
6. Time to test the code, type in terminal: node app.js
Start the server
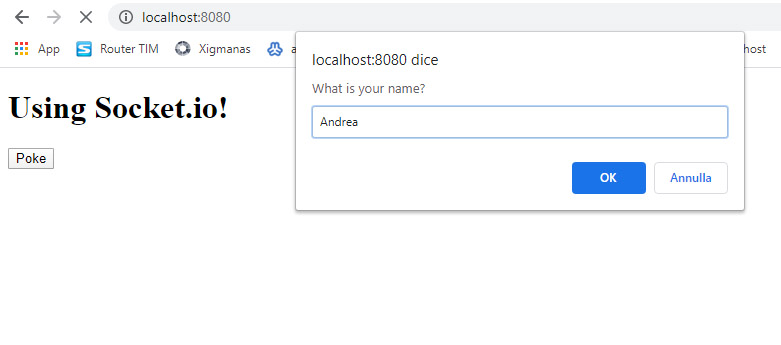
7. Connect the browser at localhost:8080
Look the terminal, it will say: New user connected
Look at the browser, it will open an alert with the server message -> this in the message from server
Push the button Poke, the terminal will receive Server listen to me! -> this in the message from client
Notice about socket.emit()
// emit one parameter only
// parameter can be everything: player_score, player_chat, player_scores
socket.emit('message', 'You are connected!');

// emit supports multiple parameter too
socket.emit('message', { content: 'You are connected!', importance: '1' });
BROADCAST
Broadcasting is the distribution of some content to a dispersed audience using WebSockets.
Take the previous code and change it as show below
laragon/www/websockets/app.js
var http = require('http');
var fs = require('fs');

// a. Load index.html
var server = http.createServer(function(req, res) {
  fs.readFile('./index.html', 'utf-8', function(error, content) {
    res.writeHead(200, {"Content-Type": "text/html"});
    res.end(content);
  });
});

// b. Load Socket.io, socket.io listen to server = http.createServer...
var io = require('socket.io').listen(server);

// c. When a client connect write a message in console
io.sockets.on('connection', function (socket) {
  console.log('New user connected');
  socket.emit('message', 'You are connected!');
  socket.broadcast.emit('messagebroadcast', 'New user connected');

// In case of an event "message" from client
  socket.on('message', function (message) {
      console.log('The client say:' + message);
  });
});

server.listen(8080);
// server
socket.broadcast.emit('messagebroadcast', 'New user connected');

// client
socket.on('messagebroadcast', function(messagebroadcast) {
    alert('Broadcast message: ' + messagebroadcast);
  });
Now at every new connection, all clients will be informed via an alert window 😀
CLIENT IDENTIFICATION
We need to identify a client to create a real life app.
Change the code as shown below:
laragon/www/websockets/app.js
var http = require('http');
var fs = require('fs');

// a. Load index.html
var server = http.createServer(function(req, res) {
  fs.readFile('./index.html', 'utf-8', function(error, content) {
    res.writeHead(200, {"Content-Type": "text/html"});
    res.end(content);
  });
});

// b. Load Socket.io, socket.io listen to server = http.createServer...
var io = require('socket.io').listen(server);

// c. When a client connect write a message in console
io.sockets.on('connection', function (socket) {

  // anonym user
  console.log('Anonym user connected');

  // know user
  socket.on('newbie', function(username) {
    socket.username = username; // store the userID here
	console.log('Username: ' + socket.username + ' connected!');
	socket.emit('message', 'You are connected as' + socket.username);
  });

});

server.listen(8080);
laragon/www/websockets/index.html
<!DOCTYPE html>
<html>
<head>
<meta charset="utf-8" />
<title>Socket.io</title>
</head>
<body>
<h1>Using Socket.io!</h1>
<p>
<input type="button" value="Poke" id="poke" />
</p>
<script src="http://code.jquery.com/jquery-1.10.1.min.js"></script>
<script src="/socket.io/socket.io.js"></script>
<script>
var socket = io.connect('http://localhost:8080');
var username = prompt('What is your name?');
socket.emit('newbie', username);
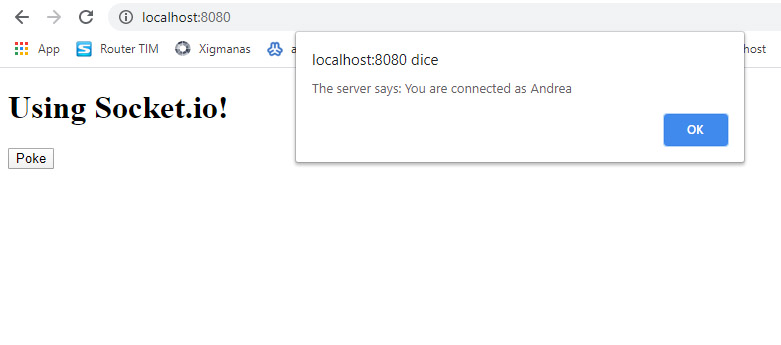
socket.on('message', function(message) {
alert('The server says: ' + message);
});
</script>
</body>
</html>
Notice that socket.io create a new session variable for every new connection, check the snippets below:
// server
socket.on('newbie', function(username) {
    socket.username = username; // store the userID here as session variable
	console.log('Username: ' + socket.username + ' connected!');
	socket.emit('message', 'You are connected as ' + socket.username);
  });

// client
var username = prompt('What is your name?');
  socket.emit('newbie', username); // YOU CAN SEND THE USER ID HERE socket.myvariable = myvariable;

  socket.on('message', function(message) {
    alert('The server says: ' + message);
  });
Now it is easy to create a simple chat software, the flow will be:
b. render in the window the message
$(“your-tag”).append() [using JQuery]
Here the official tutorial about making a chat with socket.io: https://socket.io/get-started/chat/
Have fun!
For further informations:
– official web site of socket.io https://socket.io/
– other WebSockets for node.js https://blog.bitsrc.io/8-node-js-web-socket-libraries-for-2018-818e7e5b67cf
– using express https://www.programwitherik.com/getting-started-with-socket-io-node-js-and-express/
– using react https://itnext.io/building-a-node-js-websocket-chat-app-with-socket-io-and-react-473a0686d1e1
– ready to use commercial chat applications https://codecanyon.net/tags/socket.io
Hi! I am Andrea Tonin, I am the CEO of "Luce Digitale". I can develop for you Videogames, Web Sites, 3D Hi Res Animations. Contact Me for a Free Quote!
My LinkedIn: http://www.linkedin.com/pub/andrea-tonin/50/632/396
|EN| This website uses cookies to improve your experience. We'll assume you're ok with this, but you can opt-out if you wish. |IT| Usando questo sito si accetta l'utilizzo dei cookie anche di terze parti. Per maggiori informazioni vi invitiamo a leggere l'informativa.AcceptRead More